
At our company, Unplatform, we have been building e-commerce sites for decades now. Over those years, we have seen the technology stack evolve from server-rendered pages with some minor JavaScript and CSS to full-blown JavaScript applications.
The platform we used for our e-commerce sites was based on ASP.NET and when visitors started to expect more interaction, we added React for the front-end. Although mixing the concepts of a server web framework like ASP.NET with a client-side web framework like React made things more complicated, we were quite happy with the solution. That was until we went to production with our highest traffic customer. From the moment we went live, we experienced performance issues. Core Web Vitals are important, even more so in e-commerce. In this Deloitte study: Milliseconds Make Millions, the investigators analyzed mobile site data of 37 different brands. As a result, they found that a 0.1s performance improvement can lead to a 10% increase in conversion.
To mitigate the performance issues, we had to add a lot of (unbudgeted) extra servers and had to aggressively cache pages on a reverse proxy. This even required us to disable parts of the site’s functionality. We ended up having a really complicated, expensive solution that in some cases just statically served some pages.
Obviously, this didn’t feel right, until we found out about Next.js. Next.js is a React-based web framework that allows you to statically generate pages, but you can also still use server-side rendering, making it ideal for e-commerce. It can be hosted on a CDN like Vercel or Netlify, which results in lower latency. Vercel and Netlify also use serverless functions for the Server Side Rendering, which is the most efficient way to scale out.
Challenges
Developing with Next.js is amazing, but there are definitely some challenges. The developer experience with Next.js is something you just need to experience. The code you write visualizes instantly in your browser and productivity goes through the sky. This is also a risk because you can easily get too focused on productivity and neglect the maintainability of your code. Over time, this and the untyped nature of JavaScript can lead to the degradation of your codebase. The number of bugs increases and productivity starts to go down.
It can also be challenging on the runtime side of things. The smallest changes in your code can lead to a drop in performance and other Core Web Vitals. Also, careless use of server-side rendering can lead to unexpected service costs.
Let’s have a closer look at our lessons learned in overcoming these challenges.
- Modularize Your Codebase
- Lint And Format Your Code
- Use TypeScript
- Plan For Performance And Measure Performance
- Add Performance Checks To Your Quality Gate
- Add Automated Tests
- Aggressively Manage Your Dependencies
- Use A Log Aggregation Service
- Next.js’s Rewrite Functionality Enables Incremental Adoption
Lesson Learned: Modularize Your Codebase
Front-end frameworks like Next.js make it so easy to get started these days. You just run npx create-next-app and you can start coding. But if you are not careful and start banging out code without thinking about design, you might end up with a big ball of mud.
When you run npx create-next-app, you will have a folder structure like the following (this is also how most examples are structured):
/public logo.gif
/src /lib /hooks useForm.js /api content.js /components Header.js Layout.js /pages Index.js
We started out using the same structure. We had some subfolders in the components folder for bigger components, but most of the components were in the root components folder. There is nothing wrong with this approach and it’s fine for smaller projects. However, as our project grew it became harder to reason about components and where they are used. We even found components that were no longer used at all! It also promotes a big ball of mud, because there is no clear guidance on what code should be dependent on what other code.
To solve this, we decided to refactor the codebase and group the code by functional modules (kind of like NPM modules) instead of technical concepts:
/src /modules /catalog /components productblock.js /checkout /api cartservice.js /components cart.js
In this small example, there is a checkout module and a catalog module. Grouping the code this way leads to better discoverability: by merely looking at the folder structure you know exactly what kind of functionality is in the codebase and where to find it. It also makes it a lot easier to reason about dependencies. In the previous situation, there were a lot of dependencies between the components. We had pull requests for changes in the checkout that also impacted catalog components. This increased the number of merge conflicts and made it harder to make changes.
The solution that worked best for us was to keep the dependencies between the modules to an absolute minimum (if you really need a dependency, make sure its uni-directional) and introduce a “project” level that ties everything together:
/src /modules /common /atoms /lib /catalog /components productblock.js /checkout /api cartservice.js /components cart.js /search /project /layout /components /templates productdetail.js cart.js /pages cart.js
A visual overview of this solution:

The project level contains the code for the layout of the e-commerce site and page templates. In Next.js, a page component is a convention and results in a physical page. In our experience, these pages often need to reuse the same implementation and that is why we have introduced the concept of “page templates”. The page templates use the components from the different modules, for example, the product detail page template will use components from the catalog to display product information, but also an add to cart component from the checkout module.
We also have a common module, because there is still some code that needs to be reused by the functional modules. It contains simple atoms that are React components used to provide a consistent look and feel. It also contains infrastructure code, think of certain generic react hooks or GraphQL client code.
Warning: Make sure the code in the common module is stable and always think twice before adding code here, in order to prevent tangled code.
Micro Front-Ends
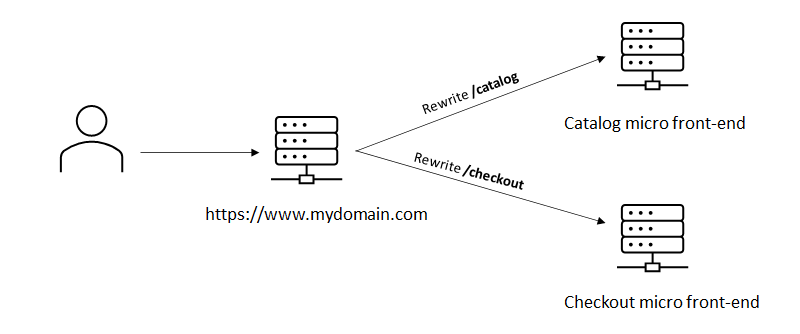
In even bigger solutions or when working with different teams, it can make sense to split up the application even more into so-called micro-frontends. In short, this means splitting up the application even more into multiple physical applications that are hosted independently on different URLs. For example: checkout.mydomain.com and catalog.mydomain.com. These are then integrated by a different application that acts as a proxy.
Next.js’ rewrite functionality is great for this and using it like this is supported by so-called Multi Zones.
The benefit of multi-zones is that every zone manages its own dependencies. It also makes it easier to incrementally evolve the codebase: If a new version of Next.js or React gets out, you can upgrade the zones one by one instead of having to upgrade the entire codebase at once. In a multi-team organization, this can greatly reduce dependencies between teams.
Further Reading
Lesson Learned: Lint And Format Your Code
This is something we learned in an earlier project: if you work in the same codebase with multiple people and don’t use a formatter, your code will soon become very inconsistent. Even if you are using coding conventions and are doing reviews, you will soon start to notice the different coding styles, giving a messy impression of the code.
A linter will check your code for potential issues and a formatter will make sure the code is formatted in a consistent way. We use ESLint & prettier and think they are awesome. You don’t have to think about the coding style, reducing the cognitive load during development.
Fortunately, Next.js 11 now supports ESLint out of the box (https://nextjs.org/blog/next-11), making it super easy to set up by running npx next lint. This saves you a lot of time because it comes with a default configuration for Next.js. For example, it is already configured with an ESLint extension for React. Even better, it comes with a new Next.js-specific extension that will even spot issues with your code that could potentially impact the Core Web Vitals of your application! In a later paragraph, we will talk about quality gates that can help you to prevent pushing code to a product that accidentally hurts your Core Web Vitals. This extension gives you feedback a lot faster, making it a great addition.
Further Reading
Lesson Learned: Use TypeScript
As components got modified and refactored, we noticed that some of the component props were no longer used. Also, in some cases, we experienced bugs because of missing or incorrect types of props being passed into the components.
TypeScript is a superset of JavaScript and adds types, which allows a compiler to statically check your code, kind of like a linter on steroids.
At the start of the project, we did not really see the value of adding TypeScript. We felt it was just an unnecessary abstraction. However, one of our colleagues had good experiences with TypeScript and convinced us to give it a try. Fortunately, Next.js has great TypeScript support out of the box and TypeScript allows you to add it to your solution incrementally. This means you don’t have to rewrite or convert your entire codebase in one go, but you can start using it right away and slowly convert the rest of the codebase.
Once we started migrating components to TypeScript, we immediately found issues with wrong values being passed into components and functions. Also, the developer feedback loop got shorter and you get notified of issues before running the app in the browser. Another big benefit we found is that it makes it a lot easier to refactor code: it is easier to see where code is being used and you immediately spot unused component props and code. In short, the benefits of TypeScript:
- Reduces the number of bugs
- Makes it easier to refactor your code
- Code gets easier to read
Further Reading
Lesson Learned: Plan For Performance And Measure Performance
Next.js supports different types of pre-rendering: Static generation and Server-side rendering. For best performance, it is recommended to use static generation, which happens during build time, but this is not always possible. Think of product detail pages that contain stock information. This kind of information changes often and running a build every time does not scale well. Fortunately, Next.js also supports a mode called Incremental Static Regeneration (ISR), which still statically generates the page, but generates a new one in the background every x seconds. We have learned that this model works great for larger applications. Performance is still great, it requires less CPU time than Server-side rendering and it reduces build times: pages only get generated on the first request. For every page you add, you should think of the type of rendering needed. First, see if you can use static generation; if not, go for Incremental Static Regeneration, and if that too is not possible, you can still use server-side rendering.
Next.js automatically determines the type of rendering based on the absence of getServerSideProps and getInitialProps methods on the page. It’s easy to make a mistake, which could cause the page to be rendered on the server instead of being statically generated. The output of a Next.js build shows exactly which page uses what type of rendering, so be sure to check this. It also helps to monitor production and track the performance of the pages and the CPU time involved. Most hosting providers charge you based on the CPU time and this helps to prevent any unpleasant surprises. I will describe how we monitor this in the Lesson learned: Use a log aggregation service paragraph.
Bundle Size
To have a good performance it is crucial to minimize the bundle size. Next.js has a lot of features out of the box that help, e.g. automatic code splitting. This will make sure that only the required JavaScript and CSS are loaded for every page. It also generates different bundles for the client and for the server. However, it is important to keep an eye on these. For example, if you import JavaScript modules the wrong way the server JavaScript can end up in the client bundle, greatly increasing the client bundle size and hurting performance. Adding NPM dependencies can also greatly impact the bundle size.
Fortunately, Next.js comes with a bundles analyzer that gives you insight into which code takes up what part of the bundles.

Further Reading
Lesson Learned: Add Performance Checks To Your Quality Gate
One of the big benefits of using Next.js is the ability to statically generate pages and to be able to deploy the application to the edge (CDN), which should result in great performance and Web Vitals. We learned that, even with great technology like Next.js, getting and keeping a great lighthouse score is really hard. It happened a number of times that after we deployed some changes to production, the lighthouse score dropped significantly. To take back control, we have added automatic lighthouse tests to our quality gate. With this Github Action you can automatically add lighthouse tests to your pull requests. We are using Vercel and every time a pull request is created, Vercel deploys it to a preview URL and we use the Github action to run lighthouse tests against this deployment.

If you don’t want to set up the GitHub action yourself, or if you want to take this even further, you could also consider a third-party performance monitoring service like DebugBear. Vercel also offers an Analytics feature, which measures the core Web Vitals of your production deployment. Vercel Analytics actually collects the measures from the devices of your visitors, so these scores are really what your visitors are experiencing. At the time of writing, Vercel Analytics only works on production deployments.
Lesson Learned: Add Automated Tests
When the codebase gets bigger it gets harder to determine if your code changes might have broken existing functionality. In our experience, it is vital to have a good set of End-to-end tests as a safety net. Even if you have a small project, it can make your life so much easier when you have at least some basic smoke tests. We have been using Cypress for this and absolutely love it. The combination of using Netlify or Vercel to automatically deploy your Pull request on a temporary environment and running your E2E tests is priceless.
We use cypress-io/GitHub-action to automatically run the cypress tests against our pull requests. Depending on the type of software you’re building it can be valuable to also have more granular tests using Enzyme or JEST. The tradeoff is that these are more tightly coupled to your code and require more maintenance.

Lesson Learned: Aggressively Manage Your Dependencies
Managing dependencies becomes a time-consuming, but oh so important activity when maintaining a large Next.js codebase. NPM made adding packages so easy and there seems to be a package for everything these days. Looking back, a lot of times when we introduced a new bug or had a drop in performance it had something to do with a new or updated NPM package.
So before installing a package you should always ask yourself the following:
- What is the quality of the package?
- What will adding this package mean for my bundle size?
- Is this package really necessary or are there alternatives?
- Is the package still actively maintained?
To keep the bundle size small and to minimize the effort needed to maintain these dependencies it is important to keep the number of dependencies as small as possible. Your future self will thank you for it when you are maintaining the software.
Tip: The Import Cost VSCode extension automatically shows the size of imported packages.
Keep Up With Next.js Versions
Keeping up with Next.js & React is important. Not only will it give you access to new features, but new versions will also include bug fixes and fixes for potential security issues. Fortunately, Next.js makes upgrading incredibly easy by providing Codemods (https://nextjs.org/docs/advanced-features/codemods. These are automatic code transformations that automatically update your code.
Update Dependencies
For the same reason, it is important to keep the Next.js and React versions actual; it is also important to update other dependencies. Github’s dependabot (https://github.com/dependabot) can really help here. It will automatically create Pull Requests with updated dependencies. However, updating dependencies can potentially break things, so having automated end-to-end tests here can really be a lifesaver.
Lesson learned: Use A Log Aggregation Service
To make sure the app is behaving properly and to preemptively find issues, we have found it is absolutely necessary to configure a log aggregation service. Vercel allows you to log in and view the logs, but these are streamed in real-time and are not persisted. It also does not support configuring alerts and notifications.
Some exceptions can take a long time to surface. For example, we had configured Stale-While-Revalidate for a particular page. At some point, we noticed that the pages were not being refreshed and that old data was being served. After checking the Vercel logging, we found that an exception was happening during the background rendering of the page. By using a log aggregation service and configuring an alert for exceptions, we would have been able to spot this a lot sooner.
Log aggregation services can also be useful to monitor the limits of Vercel’s pricing plans. Vercel’s usage page also gives you insights in this, but using a log aggregation service allows you to add notifications when you reach a certain threshold. Prevention is better than cure, especially when it comes to billing.
Vercel offers a number of out-of-the-box integrations with log aggregation services, featuring Datadog, Logtail, Logalert, Sentry, and more.

Further Reading
Lesson Learned: Next.js’s Rewrite Functionality Enables Incremental Adoption
Unless there are some serious issues with the current website, not a lot of customers are going to be excited to rewrite the entire website. But what if you could start with rebuilding only the pages that matter most in terms of Web Vitals? That is exactly what we did for another customer. Instead of rebuilding the entire site, we only rebuild the pages that matter most for SEO and conversion. In this case the product detail and category pages. By rebuilding those with Next.js, performance greatly increased.
Next.js rewrite functionality is great for this. We built a new Next.js front-end that contains the catalog pages and deployed that to the CDN. All other existing pages are rewritten by Next.js to the existing website. This way you can start having the benefits of a Next.js site in a low-effort or low-risk manner.
Further Reading
What’s Next?
When we released the first version of the project and started doing serious performance testing we were thrilled by the results. Not only were the page response times and Web Vitals so much better than before, but the operational costs were also a fraction of what it was before. Next.js and JAMStack generally allow you to scale out in the most cost-efficient way.
Switching over from a more back-end-oriented architecture to something like Next.js is a big step. The learning curve can be quite steep, and initially, some team members really felt outside of their comfort zone. The small adjustments we made, the lessons learned from this article, really helped with this. Also, the development experience with Next.js gives an amazing productivity boost. The developer feedback cycle is incredibly short!