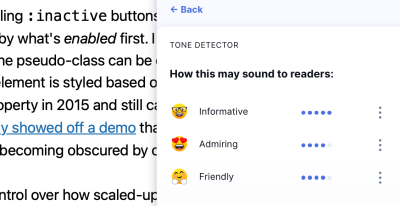
I don’t know if you’ve ever used Grammarly’s service for writing and editing content. But if you have, then you no doubt have seen the feature that detects the tone of your writing.
It’s an extremely helpful tool! It can be hard to know how something you write might be perceived by others, and this can help affirm or correct you. Sure, it’s some algorithm doing the work, and we know that not all AI-driven stuff is perfectly accurate. But as a gut check, it’s really useful.

Now imagine being able to do the same thing with audio files. How neat would it be to understand the underlying sentiments captured in audio recordings? Podcasters especially could stand to benefit from a tool like that, not to mention customer service teams and many other fields.
An audio sentiment analysis has the potential to transform the way we interact with data.
That’s what we are going to accomplish in this article.

The idea is fairly straightforward:
- Upload an audio file.
- Convert the content from speech to text.
- Generate a score that indicates the type of sentiment it communicates.
But how do we actually build an interface that does all that? I’m going to introduce you to three tools and show how they work together to create an audio sentiment analyzer.
But First: Why Audio Sentiment Analysis?
By harnessing the capabilities of an audio sentiment analysis tool, developers and data professionals can uncover valuable insights from audio recordings, revolutionizing the way we interpret emotions and sentiments in the digital age. Customer service, for example, is crucial for businesses aiming to deliver personable experiences. We can surpass the limitations of text-based analysis to get a better idea of the feelings communicated by verbal exchanges in a variety of settings, including:
- Call centers
Call center agents can gain real-time insights into customer sentiment, enabling them to provide personalized and empathetic support. - Voice assistants
Companies can improve their natural language processing algorithms to deliver more accurate responses to customer questions. - Surveys
Organizations can gain valuable insights and understand customer satisfaction levels, identify areas of improvement, and make data-driven decisions to enhance overall customer experience.
And that is just the tip of the iceberg for one industry. Audio sentiment analysis offers valuable insights across various industries. Consider healthcare as another example. Audio analysis could enhance patient care and improve doctor-patient interactions. Healthcare providers can gain a deeper understanding of patient feedback, identify areas for improvement, and optimize the overall patient experience.
Market research is another area that could benefit from audio analysis. Researchers can leverage sentiments to gain valuable insights into a target audience’s reactions that could be used in everything from competitor analyses to brand refreshes with the use of audio speech data from interviews, focus groups, or even social media interactions where audio is used.
I can also see audio analysis being used in the design process. Like, instead of asking stakeholders to write responses, how about asking them to record their verbal reactions and running those through an audio analysis tool? The possibilities are endless!
The Technical Foundations Of Audio Sentiment Analysis
Let’s explore the technical foundations that underpin audio sentiment analysis. We will delve into machine learning for natural language processing (NLP) tasks and look into Streamlit as a web application framework. These essential components lay the groundwork for the audio analyzer we’re making.
Natural Language Processing
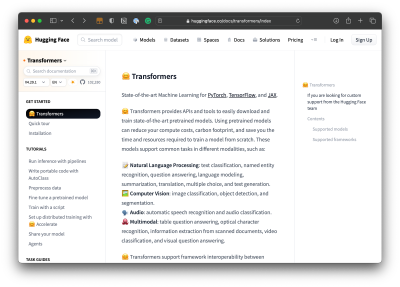
In our project, we leverage the Hugging Face Transformers library, a crucial component of our development toolkit. Developed by Hugging Face, the Transformers library equips developers with a vast collection of pre-trained models and advanced techniques, enabling them to extract valuable insights from audio data.

With Transformers, we can supply our audio analyzer with the ability to classify text, recognize named entities, answer questions, summarize text, translate, and generate text. Most notably, it also provides speech recognition and audio classification capabilities. Basically, we get an API that taps into pre-trained models so that our AI tool has a starting point rather than us having to train it ourselves.
UI Framework And Deployments
Streamlit is a web framework that simplifies the process of building interactive data applications. What I like about it is that it provides a set of predefined components that works well in the command line with the rest of the tools we’re using for the audio analyzer, not to mention we can deploy directly to their service to preview our work. It’s not required, as there may be other frameworks you are more familiar with.
Building The App
Now that we’ve established the two core components of our technical foundation, we will next explore implementation, such as
- Setting up the development environment,
- Performing sentiment analysis,
- Integrating speech recognition,
- Building the user interface, and
- Deploying the app.
Initial Setup
We begin by importing the libraries we need:
import os
import traceback
import streamlit as st
import speech_recognition as sr
from transformers import pipeline
We import os for system operations, traceback for error handling, streamlit (st) as our UI framework and for deployments, speech_recognition (sr) for audio transcription, and pipeline from Transformers to perform sentiment analysis using pre-trained models.
The project folder can be a pretty simple single directory with the following files:
app.py: The main script file for the Streamlit application.requirements.txt: File specifying project dependencies.README.md: Documentation file providing an overview of the project.
Creating The User Interface
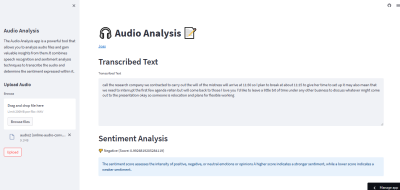
Next, we set up the layout, courtesy of Streamlit’s framework. We can create a spacious UI by calling a wide layout:
st.set_page_config(layout="wide")
This ensures that the user interface provides ample space for displaying results and interacting with the tool.
Now let’s add some elements to the page using Streamlit’s functions. We can add a title and write some text:
// app.py
st.title("🎧 Audio Analysis 📝")
st.write("[Joas](https://huggingface.co/Pontonkid)")
I’d like to add a sidebar to the layout that can hold a description of the app as well as the form control for uploading an audio file. We’ll use the main area of the layout to display the audio transcription and sentiment score.
Here’s how we add a sidebar with Streamlit:
// app.py
st.sidebar.title("Audio Analysis")
st.sidebar.write("The Audio Analysis app is a powerful tool that allows you to analyze audio files and gain valuable insights from them. It combines speech recognition and sentiment analysis techniques to transcribe the audio and determine the sentiment expressed within it.")
And here’s how we add the form control for uploading an audio file:
// app.py
st.sidebar.header("Upload Audio")
audio_file = st.sidebar.file_uploader("Browse", type=["wav"])
upload_button = st.sidebar.button("Upload")
Notice that I’ve set up the file_uploader() so it only accepts WAV audio files. That’s just a preference, and you can specify the exact types of files you want to support. Also, notice how I added an Upload button to initiate the upload process.
Analyzing Audio Files
Here’s the fun part, where we get to extract text from an audio file, analyze it, and calculate a score that measures the sentiment level of what is said in the audio.
The plan is the following:
- Configure the tool to utilize a pre-trained NLP model fetched from the Hugging Face models hub.
- Integrate Transformers’
pipelineto perform sentiment analysis on the transcribed text. - Print the transcribed text.
- Return a score based on the analysis of the text.
In the first step, we configure the tool to leverage a pre-trained model:
// app.py
def perform_sentiment_analysis(text): model_name = "distilbert-base-uncased-finetuned-sst-2-english"
This points to a model in the hub called DistilBERT. I like it because it’s focused on text classification and is pretty lightweight compared to some other models, making it ideal for a tutorial like this. But there are plenty of other models available in Transformers out there to consider.
Now we integrate the pipeline() function that does the sentiment analysis:
// app.py
def perform_sentiment_analysis(text): model_name = "distilbert-base-uncased-finetuned-sst-2-english" sentiment_analysis = pipeline("sentiment-analysis", model=model_name)
We’ve set that up to perform a sentiment analysis based on the DistilBERT model we’re using.
Next up, define a variable for the text that we get back from the analysis:
// app.py
def perform_sentiment_analysis(text): model_name = "distilbert-base-uncased-finetuned-sst-2-english" sentiment_analysis = pipeline("sentiment-analysis", model=model_name) results = sentiment_analysis(text)
From there, we’ll assign variables for the score label and the score itself before returning it for use:
// app.py
def perform_sentiment_analysis(text): model_name = "distilbert-base-uncased-finetuned-sst-2-english" sentiment_analysis = pipeline("sentiment-analysis", model=model_name) results = sentiment_analysis(text) sentiment_label = results[0]['label'] sentiment_score = results[0]['score'] return sentiment_label, sentiment_score
That’s our complete perform_sentiment_analysis() function!
Transcribing Audio Files
Next, we’re going to transcribe the content in the audio file into plain text. We’ll do that by defining a transcribe_audio() function that uses the speech_recognition library to transcribe the uploaded audio file:
// app.py
def transcribe_audio(audio_file): r = sr.Recognizer() with sr.AudioFile(audio_file) as source: audio = r.record(source) transcribed_text = r.recognize_google(audio) return transcribed_text
We initialize a recognizer object (r) from the speech_recognition library and open the uploaded audio file using the AudioFile function. We then record the audio using r.record(source). Finally, we use the Google Speech Recognition API through r.recognize_google(audio) to transcribe the audio and obtain the transcribed text.
In a main() function, we first check if an audio file is uploaded and the upload button is clicked. If both conditions are met, we proceed with audio transcription and sentiment analysis.
// app.py
def main(): if audio_file and upload_button: try: transcribed_text = transcribe_audio(audio_file) sentiment_label, sentiment_score = perform_sentiment_analysis(transcribed_text)
Integrating Data With The UI
We have everything we need to display a sentiment analysis for an audio file in our app’s interface. We have the file uploader, a language model to train the app, a function for transcribing the audio into text, and a way to return a score. All we need to do now is hook it up to the app!
What I’m going to do is set up two headers and a text area from Streamlit, as well as variables for icons that represent the sentiment score results:
// app.py
st.header("Transcribed Text")
st.text_area("Transcribed Text", transcribed_text, height=200)
st.header("Sentiment Analysis")
negative_icon = "👎"
neutral_icon = "😐"
positive_icon = "👍"
Let’s use conditional statements to display the sentiment score based on which label corresponds to the returned result. If a sentiment label is empty, we use st.empty() to leave the section blank.
// app.py
if sentiment_label == "NEGATIVE": st.write(f"{negative_icon} Negative (Score: {sentiment_score})", unsafe_allow_html=True)
else: st.empty() if sentiment_label == "NEUTRAL": st.write(f"{neutral_icon} Neutral (Score: {sentiment_score})", unsafe_allow_html=True)
else: st.empty() if sentiment_label == "POSITIVE": st.write(f"{positive_icon} Positive (Score: {sentiment_score})", unsafe_allow_html=True)
else: st.empty()
Streamlit has a handy st.info() element for displaying informational messages and statuses. Let’s tap into that to display an explanation of the sentiment score results:
// app.py
st.info( "The sentiment score measures how strongly positive, negative, or neutral the feelings or opinions are." "A higher score indicates a positive sentiment, while a lower score indicates a negative sentiment."
)
We should account for error handling, right? If any exceptions occur during the audio transcription and sentiment analysis processes, they are caught in an except block. We display an error message using Streamlit’s st.error() function to inform users about the issue, and we also print the exception traceback using traceback.print_exc():
// app.py
except Exception as ex: st.error("Error occurred during audio transcription and sentiment analysis.") st.error(str(ex)) traceback.print_exc()
This code block ensures that the app’s main() function is executed when the script is run as the main program:
// app.py
if __name__ == "__main__": main()
It’s common practice to wrap the execution of the main logic within this condition to prevent it from being executed when the script is imported as a module.
Deployments And Hosting
Now that we have successfully built our audio sentiment analysis tool, it’s time to deploy it and publish it live. For convenience, I am using the Streamlit Community Cloud for deployments since I’m already using Streamlit as a UI framework. That said, I do think it is a fantastic platform because it’s free and allows you to share your apps pretty easily.
But before we proceed, there are a few prerequisites:
- GitHub account
If you don’t already have one, create a GitHub account. GitHub will serve as our code repository that connects to the Streamlit Community Cloud. This is where Streamlit gets the app files to serve. - Streamlit Community Cloud account
Sign up for a Streamlit Cloud so you can deploy to the cloud.
Once you have your accounts set up, it’s time to dive into the deployment process:
- Create a GitHub repository.
Create a new repository on GitHub. This repository will serve as a central hub for managing and collaborating on the codebase. - Create the Streamlit application.
Log into Streamlit Community Cloud and create a new application project, providing details like the name and pointing the app to the GitHub repository with the app files. - Configure deployment settings.
Customize the deployment environment by specifying a Python version and defining environment variables.
That’s it! From here, Streamlit will automatically build and deploy our application when new changes are pushed to the main branch of the GitHub repository. You can see a working example of the audio analyzer I created: Live Demo.
Conclusion
There you have it! You have successfully built and deployed an app that recognizes speech in audio files, transcribes that speech into text, analyzes the text, and assigns a score that indicates whether the overall sentiment of the speech is positive or negative.
We used a tech stack that only consists of a language model (Transformers) and a UI framework (Streamlit) that has integrated deployment and hosting capabilities. That’s really all we needed to pull everything together!
So, what’s next? Imagine capturing sentiments in real time. That could open up new avenues for instant insights and dynamic applications. It’s an exciting opportunity to push the boundaries and take this audio sentiment analysis experiment to the next level.
Further Reading on Smashing Magazine
(gg, yk, il)
