Team communication platforms are getting popular day by day, as more and more people work from home. Slack and Discord are two of the most popular team communication platforms. While Discord is focused on gamers, some functionality, such as the ability to add up to 50 members in the voice call room, make it an excellent alternative to Slack. One of the most significant advantages of using such a platform is that many tasks can be automated using bots.
In this article, we’ll build a bot from scratch using JavaScript and with help from Discord.js. We’ll cover the process from building the bot up to deploying it to the cloud. Before building our bot, let’s jot down the functionality that our bot will have:
- Share random jokes from an array of jokes.
- Add and remove user roles by selecting emoji.
- Share tweets from a particular account to a particular channel.
Because the Discord.js module is based on Node.js, I’ll assume that you are somewhat familiar with Node.js and npm. Familiarity with JavaScript is a must for this article.
Now that we know the prerequisites and our goal, let’s start. And if you want to clone and explore the code right away, you can with the GitHub repository.
Steps To Follow
We will be building the bot by following a few steps.
First, we’ll build a Discord server. A Discord server is like a group in which you can assign various topics to various channels, very similar to a Slack server. A major difference between Slack and Discord is that Slack requires different login credentials to access different servers, whereas in Discord you can access all of the servers that you are part of with a single authentication.
The reason we need to create a server is that, without admin privileges for a server, we won’t be able to add a bot to the server. Once our server is created, we will add the bot to the server and get the access token from Discord’s developer portal. This token allows us to communicate with the Discord API. Discord provides an official open API for us to interact with. The API can be used for anything from serving requests for bots to integrating OAuth. The API supports everything from a single-server bot all the way up to a bot that can be integrated on hundreds of servers. It is very powerful and can be implemented in a lot of ways.
The Discord.js library will help us to communicate with the Discord API using the access token. All of the functions will be based on the Discord API. Then, we can start coding our bot. We will start by writing small bits of code that will introduce us to the Discord API and the Discord.js library. We will then understand the concept of partials in Discord.js. Once we understand partials, we’ll add what’s known as a “reaction role” system to the bot. With that done, we will also know how to communicate with Twitter using an npm package called twit. This npm package will help us to integrate the Twitter tweet-forwarding functionality. Finally, we will deploy it to the cloud using Heroku.
Now that we know how we are going to build our bot, let’s start working on it.
Building A Discord Server
The first thing we have to do is create a Discord server. Without a server with admin privileges, we won’t be able to integrate the bot.
Building a Discord server is easy, and Discord now provides templates, which make it even easier. Follow the steps below, and your Discord server will be ready. First, we’ll choose how we are going to access the Discord portal. We can use either the web version or the app. Both work the same way. We’ll use the web version for this tutorial.
If you’re reading this article, I’ll assume that you already have a Discord account. If not, just create an account as you would on any other website. Click the “Login” button in the top right, and log in if you have an account, or click the “Register” button. Fill out the simple form, complete the Captcha, and you will have successfully created an account. After opening the Discord app or website, click the plus icon on the left side, where the server list is. When you click it, you’ll be prompted to choose a template or to create your own.
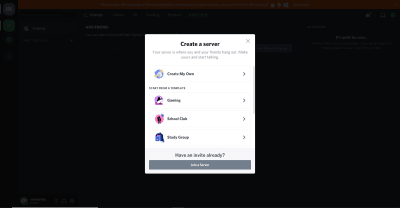
We’ll choose the “Create My Own” option. Let’s skip the next question. We’ll call our Discord server “Smashing Example”. You may also provide a photo for your server. Clicking the “Create” button will create your server.
Registering the Bot With Discord
Before coding the bot, we need to get a token provided by Discord. This token will establish a connection from our code to Discord. To get the token, we have to register our bot with our server. To register the bot, we have to visit Discord’s developer portal. If you are building a Discord app for the first time, you’ll find an empty list there. To register our app, click on the “New Application” link in the top-right corner. Give your application a name, and click the “Create” button. We’ll name our app “Smashing App”.
The new menu gives us some options. On the right side is an option labelled “Bot”. Click it, and select “Add Bot”. Click the confirmation, change the name of the bot if you want, save the changes, and copy the token received from this page. Our bot is now registered with Discord. We can start adding functionality and coding the bot.
Building The Bot
What Is Discord.js?
Discord.js defines itself like so:
Discord.js is a powerful node.js module that allows you to interact with the Discord API very easily. It takes a much more object-oriented approach than most other JS Discord libraries, making your bot’s code significantly tidier and easier to comprehend.
So, Discord.js makes interaction with the Discord API much easier. It has 100% coverage with the official Discord API.
Initializing The Bot
Open your favorite text editor, and create a folder in which all of your files will be saved. Open the command-line interface (CLI), cd into the folder, and initialize the folder with npm: npm init -y.
We will need two packages to start building the bot. The first is dotenv, and the second, obviously, is the Discord.js Node.js module. If you are familiar with Node.js, then you’ll be familiar with the dotenv package. It loads the environment variables from a file named .env to process.env.
Install these two using npm i dotenv discord.js.
Once the installation is complete, create two files in your root folder. Name one of the files .env. Name the other main file whatever you want. I’ll name it app.js. The folder structure will look like this:
│ .env
│ app.js
│ package-lock.json
│ package.json
└─── node_modules
We’ll store tokens and other sensitive information in the .env file, and store the code that produces the results in the app.js file.
Open the .env file, and create a new variable. Let’s name the variable BOT_TOKEN for this example. Paste your token in this file. The .env file will look similar to this now:
BOT_TOKEN=ODAxNzE1NTA2Njc1NDQ5ODY3.YAktvw.xxxxxxxxxxxxxxxxxxxxxxxx
We can start working on the app.js file. The first thing to do is to require the modules that we installed.
const Discord = require('discord.js');
require('dotenv').config();
The dotenv module is initialized using the config() method. We can pass in parameters to the config() method. But because this is a very simple use of the dotenv module, we don’t need any special function from it.
To start using the Discord.js module, we have to initialize a constructor. This is shown in the documentation:
const client = new Discord.Client();
The Discord.js module provides a method named client.on. The client.on method listens for various events. The Discord.js library is event-based, meaning that every time an event is emitted from Discord, the functionality attached to that event will be invoked.
The first event we will listen for is the ready event. This method will fire up when the connection with the Discord API is ready. In this method, we can pass in functions that will be executed when a connection is established between the Discord API and our app. Let’s pass a console.log statement in this method, so that we can know whether a connection is established. The client.on method with the ready event will look like this:
client.on('ready', () => { console.log('Bot is ready');
});
But, this won’t establish a connection with the API because we haven’t logged into the bot with the Discord server. To enable this, the Discord.js module provides a login method. By using the login method available on the client and passing the token in this method, we can log into the app with the Discord server.
client.login(process.env.BOT_TOKEN)
If you start the app now — with node app.js or, if you are using nodemon, then with nodemon app.js — you will be able to see the console message that you defined. Our bot has successfully logged in with the Discord server now. We can start experimenting with some functionality.
Let’s start by getting some message content depending on the code.
The message Event
The message event listens for some message. Using the reply method, we can program the bot to reply according to the user’s message.
client.on('message', (msg) => { if (msg.content === 'Hello') msg.reply('Hi');
});
This example code will reply with a “Hi” whenever a “Hello” message is received. But in order to make this work, we have to connect the bot with a server.
Connecting The Bot With A Discord Server
Up to this point, the bot is not connected with any server. To connect with our server (Smashing Example), visit Discord’s developer portal. Click on the name of the app that we created earlier in this tutorial (in our case, “Smashing App”). Select the app, and click on the “OAuth2” option in the menu. You’ll find a group named “Scopes”. Check the “bot” checkbox, and copy the URL that is generated.

Visit this URL in a new tab, choose your server, and click on “Authorize”. Complete the Captcha, and our bot will now be connected with the server that we chose.
If you visit the Discord server now, you will see that a notification has already been sent by Discord, and the bot is now also showing up in the members’ list on the right side.
Adding Functionality to the Bot
Now that our bot is connected with the server, if you send a “Hello” to the server, the bot will reply with a “Hi”. This is just an introduction to the Discord API. The real fun is about to start.
To familiarize ourselves a bit more with the Discord.js module, let’s add functionality that sends a joke whenever a particular command is received. This is similar to what we have just done.
Adding A Random Joke Function To The Bot
To make this part clearer and easier to understand, we aren’t going to use any APIs. The jokes that our bot will return will be a simple array. A random number will be generated each time within the range of the array, and that specific location of the array will be accessed to return a joke.
In case you have ever used functionality provided by a bot in Discord, you might have noticed that some special character distinguishes normal messages from special commands. I am going to use a ? in front of our commands to make them look different than normal messages. So, our joke command will be ?joke.
We will create an array named jokes in our app.js file. The way we will get a random joke from the array is by using this formula:
jokes[Math.floor(Math.random() * jokes.length)]
The Math.random() * jokes.length formula will generate a random number within the range of the array. The Math.floor method will floor the number that is generated.
If you console.log() this, Math.floor(Math.random() * jokes.length), you’ll get a better understanding. Finally, jokes[] will give us a random joke from the jokes array.
You might have noticed that our first code was used to reply to our message. But we don’t want to get a reply here. Rather, we want to get a joke as a message, without tagging anyone. For this, the Discord.js module has a method named channel.send(). Using this method, we can send messages to the channel where the command was called. So, the complete code up to this point looks like this:
const Discord = require('discord.js');
require('dotenv').config(); const client = new Discord.Client(); client.login(process.env.BOT_TOKEN); client.on('ready', () => console.log('The Bot is ready!')); // Adding jokes function // Jokes from dcslsoftware.com/20-one-liners-only-software-developers-understand/
// www.journaldev.com/240/my-25-favorite-programming-quotes-that-are-funny-too
const jokes = [ 'I went to a street where the houses were numbered 8k, 16k, 32k, 64k, 128k, 256k and 512k. It was a trip down Memory Lane.', '“Debugging” is like being the detective in a crime drama where you are also the murderer.', 'The best thing about a Boolean is that even if you are wrong, you are only off by a bit.', 'A programmer puts two glasses on his bedside table before going to sleep. A full one, in case he gets thirsty, and an empty one, in case he doesn’t.', 'If you listen to a UNIX shell, can you hear the C?', 'Why do Java programmers have to wear glasses? Because they don’t C#.', 'What sits on your shoulder and says “Pieces of 7! Pieces of 7!”? A Parroty Error.', 'When Apple employees die, does their life HTML5 in front of their eyes?', 'Without requirements or design, programming is the art of adding bugs to an empty text file.', 'Before software can be reusable it first has to be usable.', 'The best method for accelerating a computer is the one that boosts it by 9.8 m/s2.', 'I think Microsoft named .Net so it wouldn’t show up in a Unix directory listing.', 'There are two ways to write error-free programs; only the third one works.',
]; client.on('message', (msg) => { if (msg.content === '?joke') { msg.channel.send(jokes[Math.floor(Math.random() * jokes.length)]); }
});
I have removed the “Hello”/“Hi” part of the code because that is of no use to us anymore.
Now that you have a basic understanding of the Discord.js module, let’s go deeper. But the module can do a lot more — for example, adding roles to a person or banning them or kicking them out. For now, we will be building a simple reaction-role system.
Building A Reaction-Role System
Whenever a user responds with a special emoji in a particular message or channel, a role tied to that emoji will be given to the user. The implementation will be very simple. But before building this reaction-role system, we have to understand partials.
Partials
Partial is a Discord.js concept. Discord.js usually caches all messages, which means that it stores messages in a collection. When a cached message receives some event, like getting a message or a reply, an event is emitted. But messages sent before the bot has started are uncached. So, reacting to such instances will not emit any event, unless we fetch them before we use them. Version 12 of the Discord.js library introduces the concept of partials. If we want to capture such uncached events, we have to opt in to partials. The library has five types of partials:
USERCHANNELGUILD_MEMBERMESSAGEREACTION
In our case, we will need only three types of partials:
USER, the person who reacts;MESSAGE, the message being reacted to;REACTION, the reaction given by the user to the message.
The documentation has more about partials.
The Discord.js library provides a very easy way to use partials. We just need to add a single line of code, passing an object in the Discord.Client() constructor. The new constructor looks like this:
const client = new Discord.Client({ partials: ['MESSAGE', 'REACTION', 'CHANNEL'],
});
Creating Roles On The Discord Server
To enable the reaction-role system, we have to create some roles. The first role we are going to create is the bot role. To create a role, go to “Server Settings”:
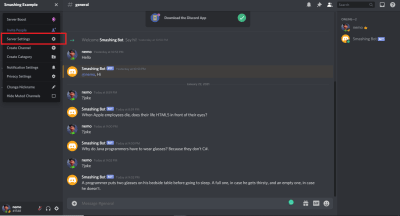
In the server settings, go to the “Roles” option, and click on the small plus icon (+) beside where it says “Roles”.
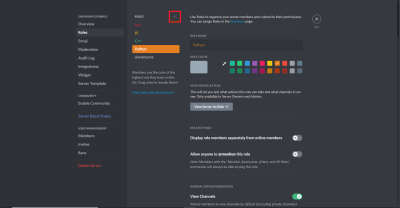
First, let’s create the bot role, and make sure to check the “Manage Roles” option in the role options menu. Once the bot role is created, you can add some more roles. I’ve added js, c++, and python roles. You don’t have to give them any special ability, but it’s an option.
Here, remember one thing: The Discord roles work based on priority. Any role that has roles below it can manage the roles below it, but it can’t manage the roles above it. We want our bot role to manage the js, c++, and python roles. So, make sure that the bot role is above the other roles. Simply drag and drop to change the order of the roles in the “Roles” menu of your server settings.
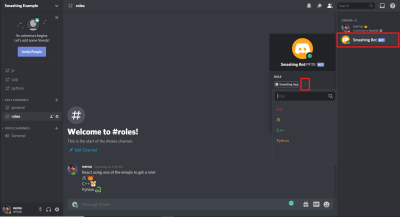
When you are done creating roles, assign the bot role to the bot. To give a role, click on the bot’s name in the members’ list on the server’s right side, and then click on the small plus icon (+). It’ll show you all of the available roles. Select the “bot” role here, and you will be done.
Activating Developer Mode in Discord
The roles we have created cannot be used by their names in our code. In Discord, everything from messages to roles has its own ID. If you click on the “more” indicator in any message, you’ll see an option named “Copy ID”. This option is available for everything in Discord, including roles.
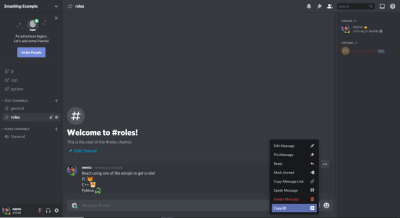
Most likely, you won’t find this option by default. You’ll have to activate an option called “Developer Mode”. To activate it, head to the Discord settings (not your server settings), right next to your name in the bottom left. Then go to the “Appearance” option under “App Settings”, and activate “Developer Mode” from here. Now you’ll be able to copy IDs.
messageReactionAdd and messageReactionRemove
The event that needs to be emitted when a message is reacted is messageReactionAdd. And whenever a reaction is removed, the messageReactionRemove event should be emitted.
Let’s continue building the system. As I said, first we need to listen for the messageReactionAdd event. Both the messageReactionAdd and messageReactionRemove events take two parameters in their callback function. The first parameter is reaction, and the second is user. These are pretty self-explanatory.
Coding the Reaction-Role Functionality
First, we’ll create a message that describes which emoji will give which role, something like what I’ve done here:
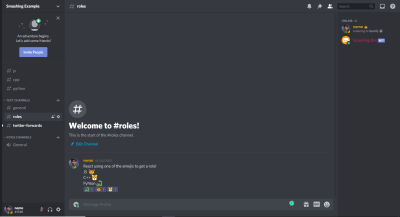
You might be thinking, how are we going to use those emoji in our code? The default emoji are Unicode, and we will have to copy the Unicode version. If you follow the syntax \:emojiName: and hit “Enter”, you will get an emoji with the name. For example, my emoji for the JavaScript role is fox; so, if I type in \:fox: and hit “Enter” in Discord, I’ll receive a fox emoji. Similarly, I would use \:tiger: and \:snake: to get those emoji. Keep these in your Discord setup; we will need them later.
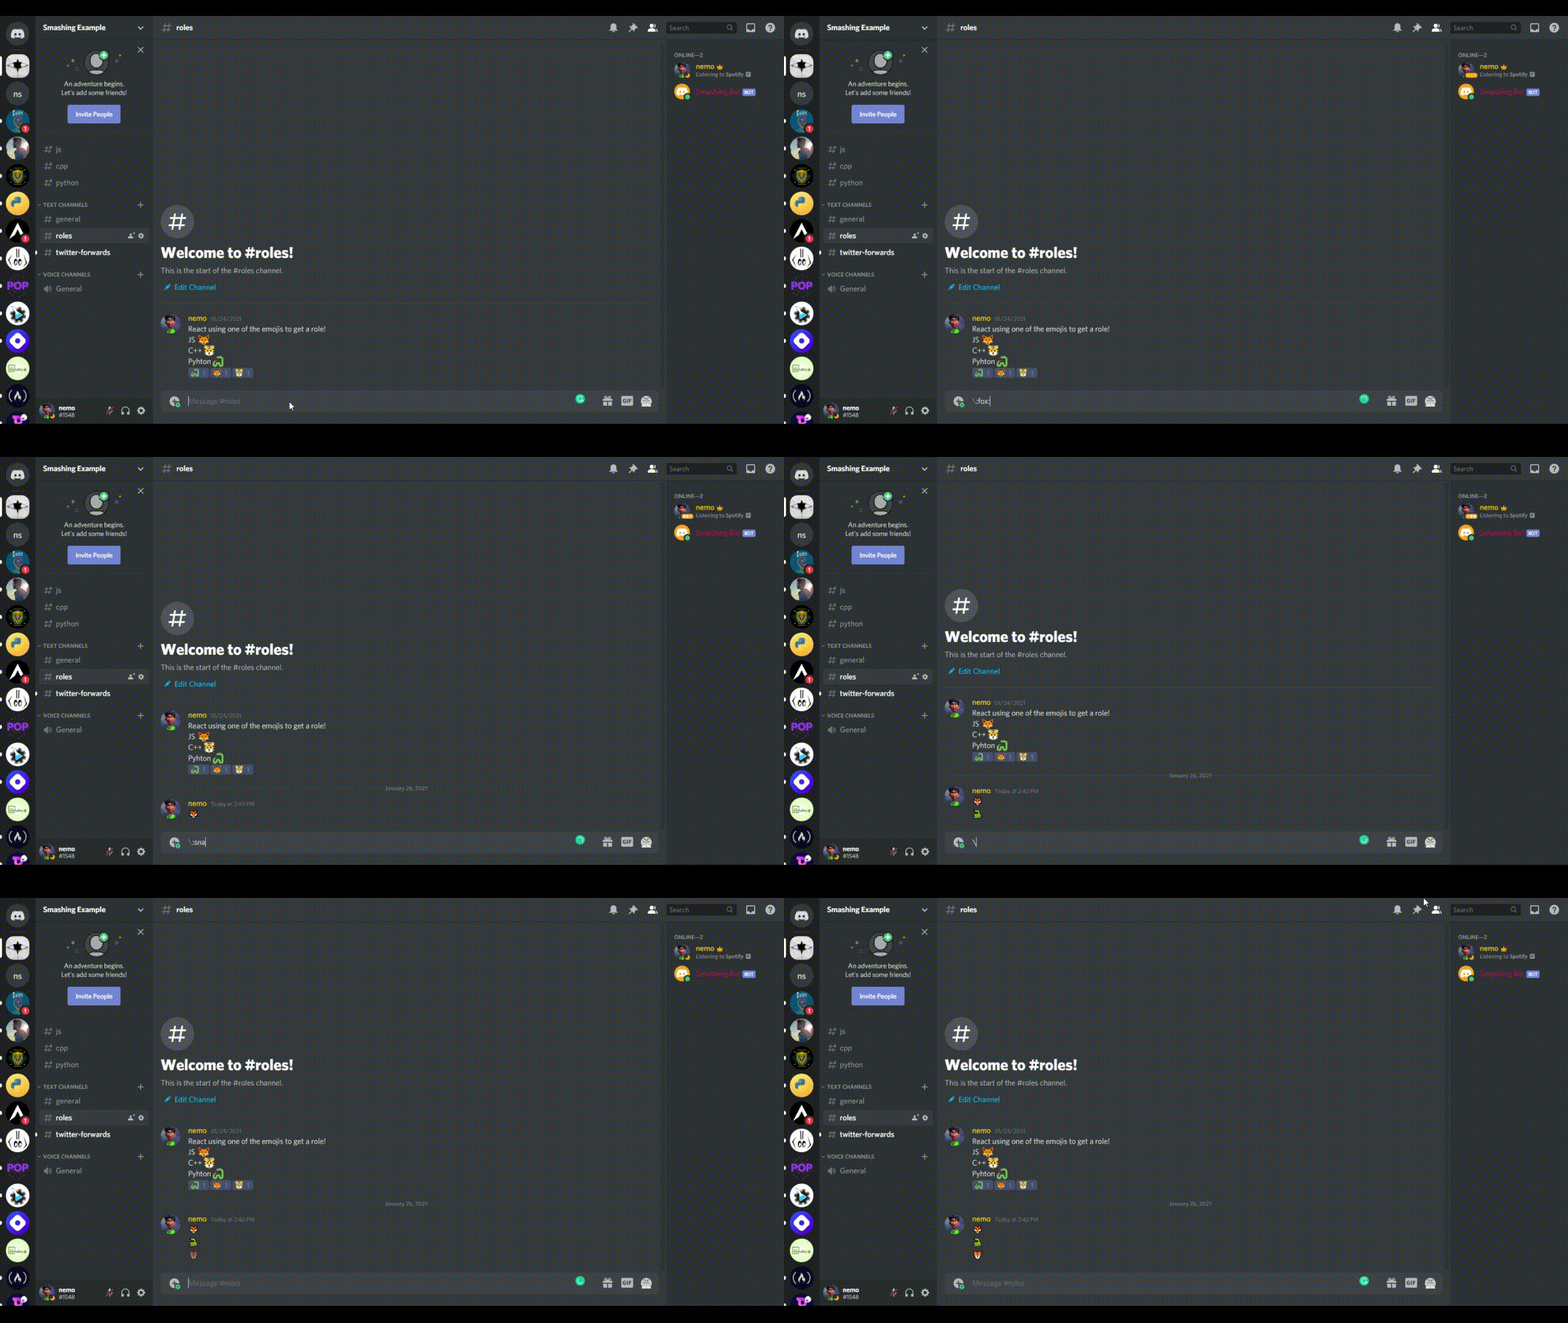
Here is the starting code. This part of the code simply checks for some edge cases. Once we understand these cases, we’ll implement the logic of the reaction-role system.
// Adding reaction-role function
client.on('messageReactionAdd', async (reaction, user) => { if (reaction.message.partial) await reaction.message.fetch(); if (reaction.partial) await reaction.fetch(); if (user.bot) return; if (!reaction.message.guild) return;
});
We are passing in an asynchronous function. In the callback, the first thing we are doing is checking whether the message is a partial. If it is, then we fetch it, meaning caching or storing it in a JavaScript map method. Similarly, we are checking whether the reaction itself is a partial and then doing the same thing. Then, we check whether the user who reacted is a bot, because we don’t want to assign roles to the bot that is reacting to our messages. Finally, we are checking whether the message is on the server. Discord.js uses guild as an alternative name of the server. If the message is not on the server, then we would stop the function.
Our bot will only assign the roles if the message is in the roles channel. If you right-click on the roles channel, you’ll see a “Copy ID” option. Copy the ID and follow along.
if (reaction.message.channel.id == '802209416685944862') { if (reaction.emoji.name === '🦊') { await reaction.message.guild.members.cache .get(user.id) .roles.add('802208163776167977'); } if (reaction.emoji.name === '🐯') { await reaction.message.guild.members.cache .get(user.id) .roles.add('802208242696192040'); } if (reaction.emoji.name === '🐍') { await reaction.message.guild.members.cache .get(user.id) .roles.add('802208314766524526'); }
} else return;
Above is the rest of the code in the callback. We are using the reaction.message.channel.id property to get the ID of the channel. Then, we are comparing it with the roles channel ID that we just copied. If it is true, then we check for the emoji and compare them with the reactions. The reaction.emoji.name returns the emoji that was used to react. We compare it with our Unicode version of the emoji. If they match, then we await for the reaction.message.guild.members.cache property.
The cache is a collection that stores the data. These collections are a JavaScript Map with additional utilities. One of the utilities that it provides is the get method. To get anything by ID, we can simply pass in the ID in this method. So, we pass the user.id in the get method to get the user. Finally, the roles.add method adds the role to the user. In the roles.add method, we are passing the role ID. You can find the role ID in your server setting’s “Role” option. Right-clicking on a role will give you the option to copy the role ID. And we are done adding the reaction-role system to our bot!
We can add functionality for a role to be removed when a user removes their reaction from the message. This is exactly the same as our code above, the only difference being that we are listening for the messageReactionRemove event and using the roles.remove method. So, the complete code for adding and removing roles would be like this:
// Adding reaction-role function
client.on('messageReactionAdd', async (reaction, user) => { if (reaction.message.partial) await reaction.message.fetch(); if (reaction.partial) await reaction.fetch(); if (user.bot) return; if (!reaction.message.guild) return; if (reaction.message.channel.id == '802209416685944862') { if (reaction.emoji.name === '🦊') { await reaction.message.guild.members.cache .get(user.id) .roles.add('802208163776167977'); } if (reaction.emoji.name === '🐯') { await reaction.message.guild.members.cache .get(user.id) .roles.add('802208242696192040'); } if (reaction.emoji.name === '🐍') { await reaction.message.guild.members.cache .get(user.id) .roles.add('802208314766524526'); } } else return;
}); // Removing reaction roles
client.on('messageReactionRemove', async (reaction, user) => { if (reaction.message.partial) await reaction.message.fetch(); if (reaction.partial) await reaction.fetch(); if (user.bot) return; if (!reaction.message.guild) return; if (reaction.message.channel.id == '802209416685944862') { if (reaction.emoji.name === '🦊') { await reaction.message.guild.members.cache .get(user.id) .roles.remove('802208163776167977'); } if (reaction.emoji.name === '🐯') { await reaction.message.guild.members.cache .get(user.id) .roles.remove('802208242696192040'); } if (reaction.emoji.name === '🐍') { await reaction.message.guild.members.cache .get(user.id) .roles.remove('802208314766524526'); } } else return;
});
Adding Twitter Forwarding Function
The next function we are going to add to our bot is going to be a bit more challenging. We want to focus on a particular Twitter account, so that any time the Twitter account posts a tweet, it will be forwarded to our Discord channel.
Before starting to code, we will have to get the required tokens from the Twitter developer portal. Visit the portal and create a new app by clicking the “Create App” button in the “Overview” option. Give your app a name, copy all of the tokens, and paste them in the .env file of your code, with the proper names. Then click on “App Settings”, and enable the three-legged OAuth feature. Add the URLs below as callback URLs for testing purposes:
http://127.0.0.1/
https://localhost/
If you own a website, add the address to the website URL and click “Save”. Head over to the “Keys and Tokens” tab, and generate the access keys and tokens. Copy and save them in your .env file. Our work with the Twitter developer portal is done. We can go back to our text editor to continue coding the bot. To achieve the functionality we want, we have to add another npm package named twit. It is a Twitter API client for Node.js. It supports both REST and streaming API.
First, install the twit package using npm install twit, and require it in your main file:
const Twit = require('twit');
We have to create a twit instance using the Twit constructor. Pass in an object in the Twit constructor with all of the tokens that we got from Twitter:
const T = new Twit({ consumer_key: process.env.API_TOKEN, consumer_secret: process.env.API_SECRET, access_token: process.env.ACCESS_KEY, access_token_secret: process.env.ACCESS_SECRET, bearer_token: process.env.BEARER_TOKEN, timeout_ms: 60 * 1000,
});
A timeout is also specified here. We want all of the forwards to be in a specific channel. I have created a separate channel called “Twitter forwards”, where all of the tweets will be forwarded. I have already explained how you can create a channel. Create your own channel and copy the ID.
// Destination Channel Twitter Forwards
const dest = '803285069715865601';
Now we have to create a stream. A stream API allows access to a stream of data over the network. The data is broken into smaller chunks, and then it is transmitted. Here is our code to stream the data:
// Create a stream to follow tweets
const stream = T.stream('statuses/filter', { follow: '32771325', // @Stupidcounter
});
In the follow key, I am specifying @Stupidcounter because it tweets every minute, which is great for our testing purposes. You can provide any Twitter handle’s ID to get its tweets. TweeterID will give you the ID of any handle. Finally, use the stream.on method to get the data and stream it to the desired channel.
stream.on('tweet', (tweet) => { const twitterMessage = `Read the latest tweet by ${tweet.user.name} (@${tweet.user.screen_name}) here: https://twitter.com/${tweet.user.screen_name}/status/${tweet.id_str}`; client.channels.cache.get(dest).send(twitterMessage); return;
});
We are listening for the tweet event and, whenever that occurs, passing the tweet to a callback function. We’ll build a custom message; in our case, the message will be:
Read the latest tweet by The Count (@Stupidcounter) here: https://twitter.com/Stupidcounter/status/1353949542346084353
Again, we are using the client.channels.cache.get method to get the desired channel and the .send method to send our message. Now, run your bot and wait for a minute. The Twitter message will be sent to the server.

So, here is the complete Twitter forwarding code:
// Adding Twitter forward function
const Twit = require('twit');
const T = new Twit({ consumer_key: process.env.API_TOKEN, consumer_secret: process.env.API_SECRET, access_token: process.env.ACCESS_KEY, access_token_secret: process.env.ACCESS_SECRET, bearer_token: process.env.BEARER_TOKEN, timeout_ms: 60 * 1000,
}); // Destination channel Twitter forwards
const dest = '803285069715865601';
// Create a stream to follow tweets
const stream = T.stream('statuses/filter', { follow: '32771325', // @Stupidcounter
}); stream.on('tweet', (tweet) => { const twitterMessage = `Read the latest tweet by ${tweet.user.name} (@${tweet.user.screen_name}) here: https://twitter.com/${tweet.user.screen_name}/status/${tweet.id_str}`; client.channels.cache.get(dest).send(twitterMessage); return;
});
All of the functions that we want to add are done. The only thing left now is to deploy it to the cloud. We’ll use Heroku for that.
Deploying The Bot To Heroku
First, create a new file in the root directory of your bot code’s folder. Name it Procfile. This Procfile will contain the commands to be executed when the program starts. In the file, we will add worker: node app.js, which will inform Heroku about which file to run at startup.
After adding the file, let’s initiate a git repository, and push our code to GitHub (how to do so is beyond the scope of this article). One thing I would suggest is to add the node_modules folder and the .env file to the .gitignore file, so that your package size remains small and sensitive information does not get shared outside.
Once you’ve successfully pushed all of your code to GitHub, visit the Heroku website. Log in, or create an account if you don’t have one already. Click on the “New” button to create a new app, and name it as you wish. Choose the “Deployment Method” as GitHub.
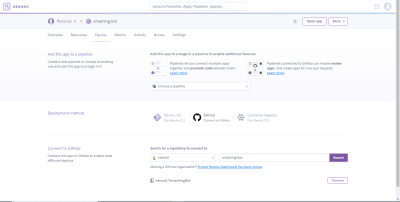
Search for your app, and click on connect once you find it. Enable automatic deployment from the “Deploy” menu, so that each time you push changes to the code, the code will get deployed automatically to Heroku.
Now, we have to add the configuration variables to Heroku, which is very easy. Go to the “Settings” option, below your app’s name, and click on “Reveal Config Vars”.
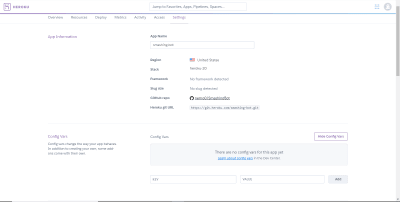
Here, we’ve added the configuration variables as key-value pairs. Once you are done, go to the “Deploy” tab again, and click on “Deploy Branch” under “Manual Deploy”.
The last thing to consider is that you might encounter a 60-second error crash that stops the bot from executing. To prevent this from happening, we have to change the worker type of the app. In Heroku, if you go to the “Resources” tab of your app, you’ll see that, under “Free Dynos”, web npm start is enabled. We have to turn this off and enable worker node app.js. So, click on the edit button beside the web npm start button, turn it off, and enable the worker node app.js option. Confirm the change. Restart all of your dynos, and we are done!
Conclusion
I hope you’ve enjoyed reading this article. I tried to cover all of the basics that you need to understand in developing a complicated bot. Discord.js’ documentation is a great place to learn more. It has great explanations. Also, you will find all of the code in the GitHub repository. And here are a few resources that will be helpful in your further development:
(vf, il, al)


