So, you want to give personality to your site by making it stand out from all other websites out there. To do that, you develop a personalized design style, including a certain combination of colors, typography, spacing, animations, and others, and apply the style consistently throughout your site.
An example in case is this same website, Smashing Magazine. One of the objectives of its big redesign was to infuse the site with a uniquely distinctive personality. That’s why all avatars, the arrow button, and many other elements are all tilted, at the same angle as the Smashing logo is:

What about images? They can also take part in the unique design so that visitors browsing your site will immediately recognize it simply by looking at the content. For instance, I remember The Verge’s old bold design, which placed striking colors over its images:

Applying style to the images can be achieved with CSS. However, then the style will not be present when referencing the image directly (such as the image shared in social media via the <meta property="og:image" content="{image-url}"> tag), making the image devoid of personality.
The images embedded in social media when sharing our content are of particular interest. These images should carry the personality of the site, for which the style must be embedded in the image itself, instead of being applied via CSS. For instance, in SmashingMag’s Twitter account, the article’s featured image has a customized and consistent style, giving it a unique personality:

Adding the style to the images on our site can be done manually (with Photoshop or some other image editing tool), but editing images is effort-intensive. The images need to be manipulated and re-uploaded to the site, for all the possible sizes (such as the featured image and each of the thumbnails) and all defined sets of styles (for instance, a page for the Black Friday sales could have its own style).
It makes more sense to automate this task. Automation is doable when the design is based on a series of transformations, to be applied one after the other, such as:
- Adding a watermark;
- Making the image round;
- Rotating the image to a certain angle;
- Adding a border, with a specific thickness and color;
- Adding a shadow;
- Cropping the image to a certain aspect ratio or fixed dimensions;
- Cropping the image around the face of the person;
- Converting the image to grayscale, or adding hue;
- Sharpening the image.
By defining a list of transformations, the task to apply the desired style to our images can be automated. As a result, the effort to produce a consistent style throughout the website, and change it at any time down the road, is greatly reduced.
Applying styles throughout the website now becomes:
- We preselect the styles to be applied to the images, for the whole site or a custom section, via configuration on the website’s back-end;
- We upload the original images.
Then, the images will be automatically applied transformations to produce the desired styles, and readily available to be inserted into the page via the website’s media manager.
We can do exactly this via Cloudinary, a service that helps produce and deliver optimal digital experiences. Being based on the cloud, Cloudinary can be integrated with any site, based on any stack or technology. For this article, I’ll be using its integration with WordPress and its plugin for WordPress v3.0 to demonstrate its transformation capabilities.
Let’s start!
Adding Transformations To The Images
Cloudinary offers an extensive list of transformations, including all the ones I mentioned earlier on and many more, to manipulate not only images but also videos. Adding the desired transformations to an image’s URL, the image can be modified in myriad ways. I’ll demonstrate this by creating a thumbnail for an image.
In this pic, I’m with a couple of friends in sunny Barcelona:
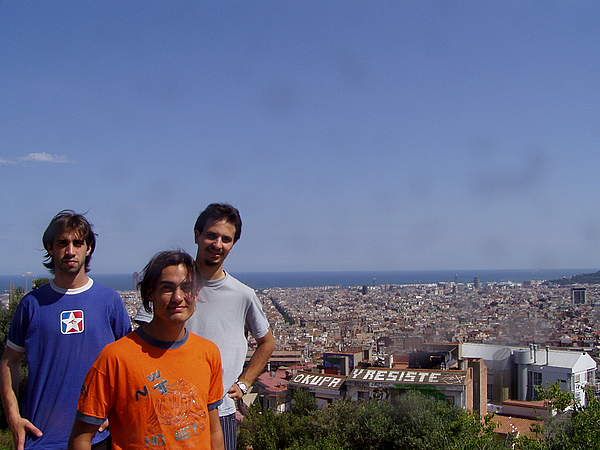
This picture in full size will be my post’s featured image. For the homepage, I want to link to the post using a thumbnail 300 pixels wide. To scale the image down, I attach transformation w_300 to the image’s URL:
The result is this one:

Being a scaled-down version of the original image, the people inside this thumbnail look small. Let’s make them bigger, by cropping the image. For that, we attach transformation c_crop after the previous transformation:
The result is this one:

Yikes! What happened? One of my friends has been cropped out of the image! Let’s put him back in by applying the cropping around the south-west section of the image via the gravity transformation g_south_west:
The result is this one:

Ok, my friend is back, but now the heads of my two friends have been chopped off! To fix this, Cloudinary offers a better option: using transformation g_faces will have an AI identify the faces in the image, and perform the cropping around these:
The result is this one:

This looks much better! Now, what would happen if there were no people in the picture, so we can’t use g_faces? Cloudinary offers a still better option: using g_auto, an AI will automatically decide which is the most interesting section of the image, and perform the cropping around it:
The result is this one:

Now the thumbnail looks perfect.
Finally, I want to apply some distinctive style that makes my site unique. I’ve decided to apply the hue level to 40, via transformation e_hue:40:
The result is this one:

I finally got it: the transformation I want to apply to my images, to obtain the thumbnails for the homepage, is w_300,c_crop,g_auto,e_hue:40.
Serving The Most Optimal Images
In addition to using image transformations for styling, we can use them to compress images in order to load them faster. Indeed, reducing the size of the images is exceptionally important in order to improve the performance of the site.
Cloudinary is ideal to optimize performance, for two main reasons:
- The images are served via a CDN, located near the user browsing the site, greatly reducing the latency of the request;
- The service automatically compresses the images to the most optimal version, sparing this effort to the team.
In order to deliver the most optimal version of the image, Cloudinary offers a couple of handy transformations:
f_auto: Automatically uses the most suitable image format, including AVIF, WebP, PNG and JPG.q_auto: Automatically calculates and serves the best tradeoff between visual quality and file size.
For instance, if the browser supports the new AVIF format, then the served image will be of type image/avif, producing significant savings in file size while not decreasing the visual quality. Otherwise, it will serve image/webp if supported, or fall back to image/png or image/jpg (or some other format).
In the screenshot below, I have appended transformation f_auto,q_auto to the image from earlier on, and loaded it in Firefox and Safari. While in Safari the image is retrieved as image/jp2, in Firefox it is served as image/webp, thus transferring fewer bytes:

Transforming Images In WordPress
Cloudinary has recently released v3.0 of its WordPress plugin, with several handy new features. Let’s use this plugin to automatically apply transformations to the images on a WordPress site.
If we are not Cloudinary users yet, we can create an account for free. When installing the plugin, we will need to provide the connection information of our Cloudinary account:

Once installed, the plugin’s dashboard will provide statistics of the transformations, bandwidth and storage the website is using:

In the “General settings” page we can configure if to synchronize the uploaded images to Cloudinary automatically or manually, under what folder to save the images for the site (which is particularly useful if we’re using Cloudinary for more than one site), and where to host the images.
By default, images are hosted in both the Cloudinary cloud and the WordPress server, giving us the chance to disable the Cloudinary plugin at any time without any data loss:
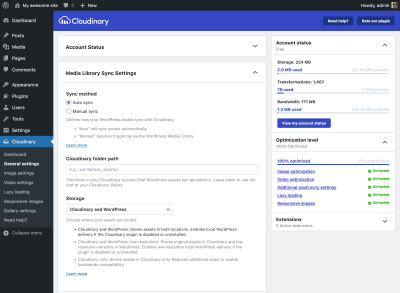
In the “Image Settings” page, we can define global transformations to apply to all images. By default, all images have properties “Image format” and “Image quality” set to “Auto”, which (as explained earlier on) will produce the most optimal version of the image according to the specific device and browser:
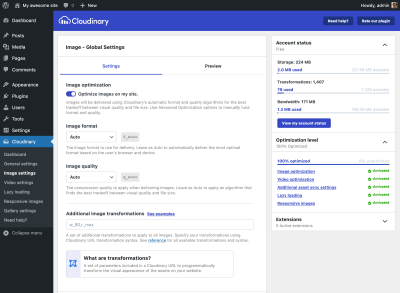
On this page, we can also define “Additional image transformations”, to be applied to all images. For instance, I can define here transformation e_hue:40 to apply a hue level of 40 to all the images on my site.
We can also be more selective when applying the style. We can define transformations for a specific tag or category, which will be applied to the media elements added to the post with that tag or category:
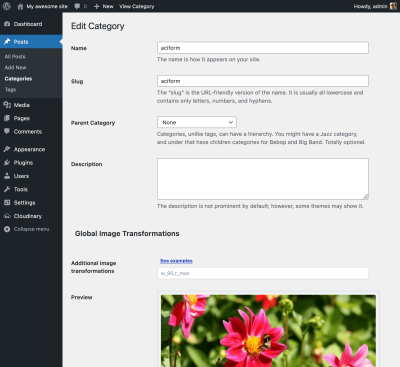
The other pages under the “Cloudinary” menu enable us to configure the general options of the plugin, so that we can do all of the following:
- Define transformations for videos (in addition to images);
- Use lazy loading, which improves performance by loading an image only when it appears within the viewport;
- Define breakpoints for responsive images, which improves performance by allowing the browser to load the smallest image that fits within the device’s screen;
- Configure Cloudinary’s Gallery block for the WordPress editor.
Applying Transformations To Individual Images
In addition to defining transformations to be applied across the site, or for a specific tag or category, we can also apply transformations individually to a certain image, right when inserting the image into the post.
When opening the Media Manager, there will be a new tab “Cloudinary”. Clicking there we can browse all the images hosted in our account, and apply custom transformations to them. As a result, a new image will be created on the WordPress site, to be added to the post as usual:
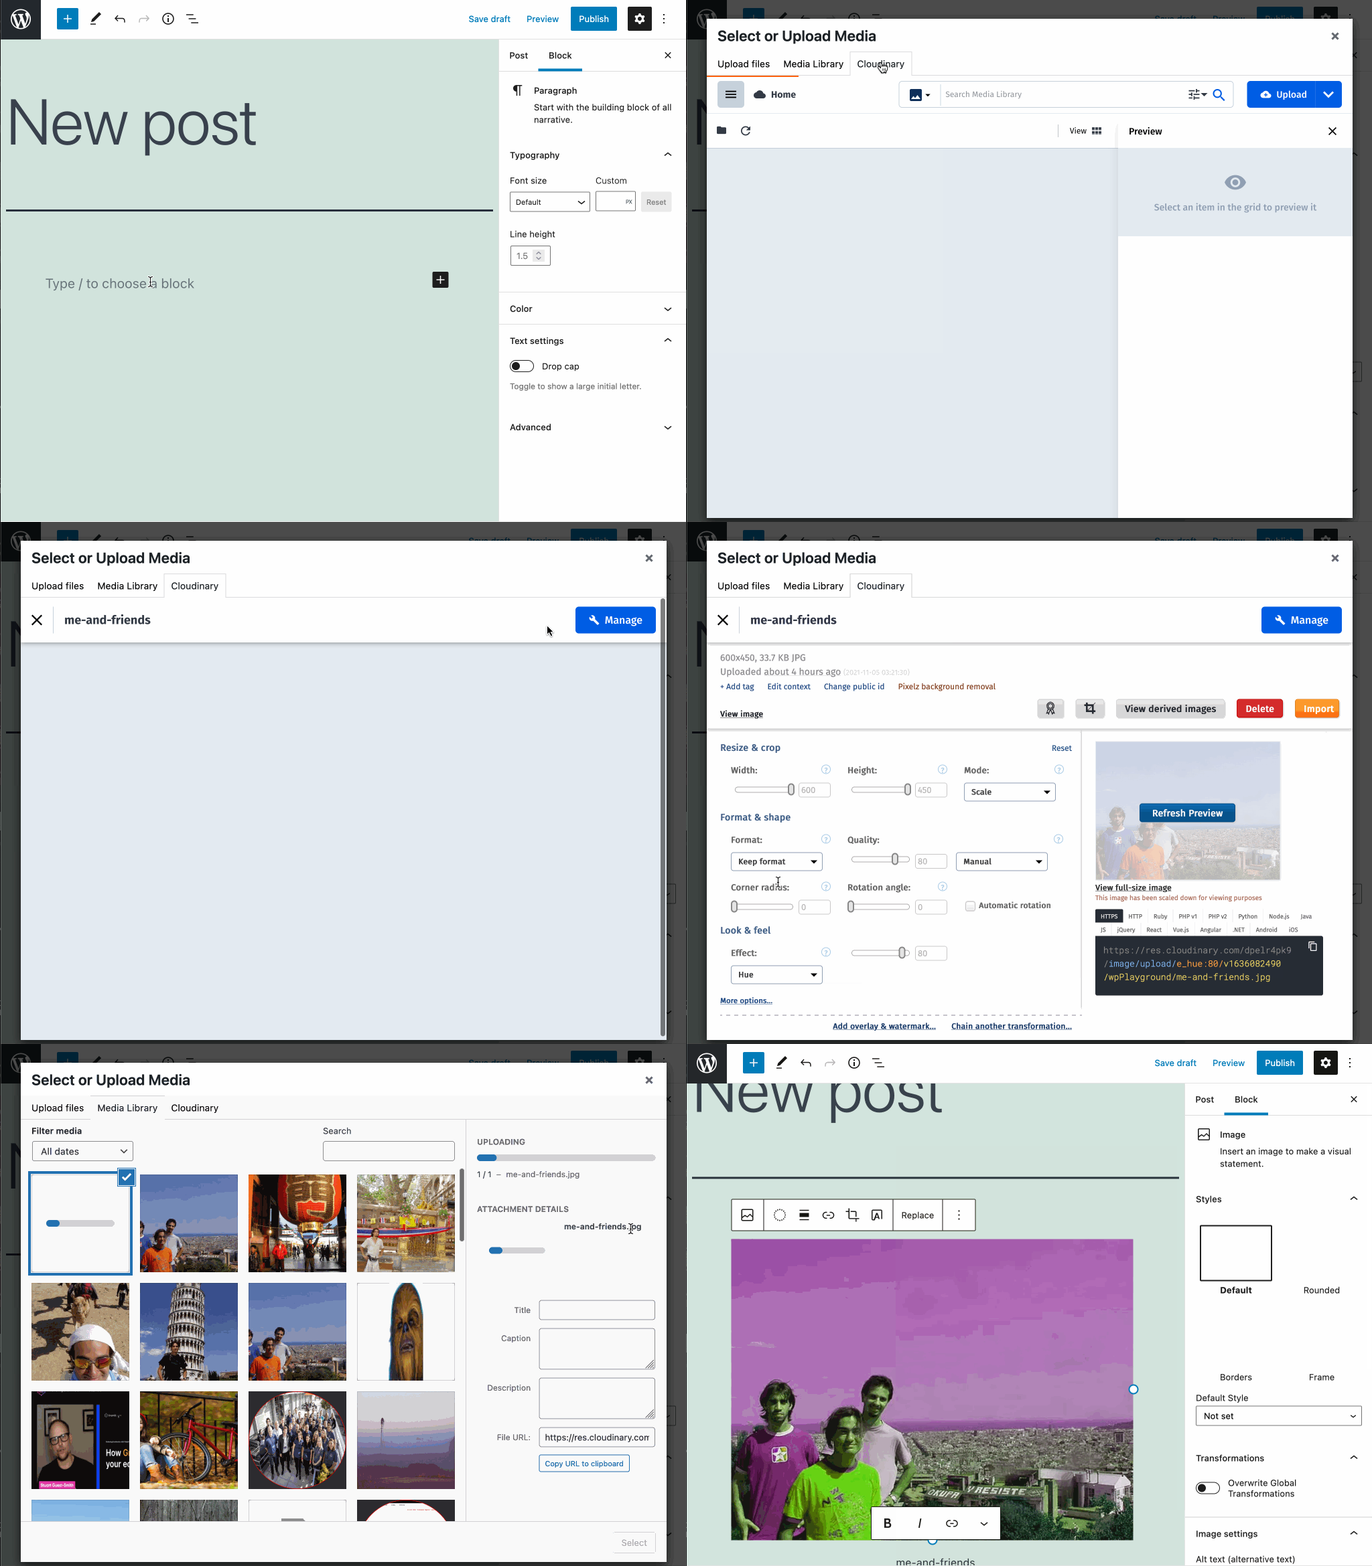
I also want to add an overlay caption “Me and my friends in sunny Barcelona” on the image. To achieve this, the transformation l_text:Arial_25:Me and my friends in sunny Barcelona,g_north_west,y_70,x_25 will add an overlay text and position it on a specific place on top of the image:

Now, since the transformed image is yet another image on the WordPress site, we can also use the WordPress editor to add the overlay text. For this, we can transform the image into a Cover block and add a caption:

In addition to the WordPress editor, Cloudinary’s plugin is also fully compatible with all popular page builders, including Elementor and Divi.
Conclusion
If we want to make our websites successful, we need to pay special attention to two concerns:
- Design
You need to have the website stand out from all other websites out there by giving it a unique personality. - Speed
Make sure that the website is as fast as possible for an optimal user experience, and to score the highest Core Web Vitals so that it can index higher in Google.
In both accounts, Cloudinary can help us out. All it takes to add a custom design for our images is to select the desired transformations, and the image (optimized to the specific browser and device) will be served from a CDN with data centers all over the world — delivering a super-fast experience.
If you have a WordPress site, the latest version of the plugin provides an enhanced experience, including seamless integration with the WordPress editor, full compatibility with the major page builders, a new dashboard providing stats on the usage of the service, and improved features to optimize your site. Check it out!
