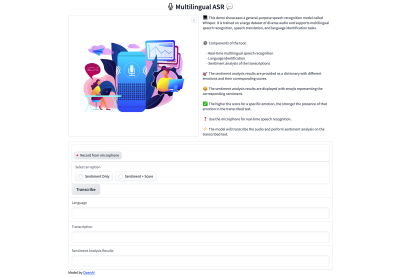
In the previous article, we developed a sentiment analysis tool that could detect and score emotions hidden within audio files. We’re taking it to the next level in this article by integrating real-time analysis and multilingual support. Imagine analyzing the sentiment of your audio content in real-time as the audio file is transcribed. In other words, the tool we are building offers immediate insights as an audio file plays.
So, how does it all come together? Meet Whisper and Gradio — the two resources that sit under the hood. Whisper is an advanced automatic speech recognition and language detection library. It swiftly converts audio files to text and identifies the language. Gradio is a UI framework that happens to be designed for interfaces that utilize machine learning, which is ultimately what we are doing in this article. With Gradio, you can create user-friendly interfaces without complex installations, configurations, or any machine learning experience — the perfect tool for a tutorial like this.
By the end of this article, we will have created a fully-functional app that:
- Records audio from the user’s microphone,
- Transcribes the audio to plain text,
- Detects the language,
- Analyzes the emotional qualities of the text, and
- Assigns a score to the result.
Note: You can peek at the final product in the live demo.
Automatic Speech Recognition And Whisper
Let’s delve into the fascinating world of automatic speech recognition and its ability to analyze audio. In the process, we’ll also introduce Whisper, an automated speech recognition tool developed by the OpenAI team behind ChatGPT and other emerging artificial intelligence technologies. Whisper has redefined the field of speech recognition with its innovative capabilities, and we’ll closely examine its available features.
Automatic Speech Recognition (ASR)
ASR technology is a key component for converting speech to text, making it a valuable tool in today’s digital world. Its applications are vast and diverse, spanning various industries. ASR can efficiently and accurately transcribe audio files into plain text. It also powers voice assistants, enabling seamless interaction between humans and machines through spoken language. It’s used in myriad ways, such as in call centers that automatically route calls and provide callers with self-service options.
By automating audio conversion to text, ASR significantly saves time and boosts productivity across multiple domains. Moreover, it opens up new avenues for data analysis and decision-making.
That said, ASR does have its fair share of challenges. For example, its accuracy is diminished when dealing with different accents, background noises, and speech variations — all of which require innovative solutions to ensure accurate and reliable transcription. The development of ASR systems capable of handling diverse audio sources, adapting to multiple languages, and maintaining exceptional accuracy is crucial for overcoming these obstacles.
Whisper: A Speech Recognition Model
Whisper is a speech recognition model also developed by OpenAI. This powerful model excels at speech recognition and offers language identification and translation across multiple languages. It’s an open-source model available in five different sizes, four of which have an English-only variant that performs exceptionally well for single-language tasks.
What sets Whisper apart is its robust ability to overcome ASR challenges. Whisper achieves near state-of-the-art performance and even supports zero-shot translation from various languages to English. Whisper has been trained on a large corpus of data that characterizes ASR’s challenges. The training data consists of approximately 680,000 hours of multilingual and multitask supervised data collected from the web.
The model is available in multiple sizes. The following table outlines these model characteristics:
| Size | Parameters | English-only model | Multilingual model | Required VRAM | Relative speed |
|---|---|---|---|---|---|
| Tiny | 39 M | tiny.en |
tiny | ~1 GB | ~32x |
| Base | 74 M | base.en |
base | ~1 GB | ~16x |
| Small | 244 M | small.en |
small | ~2 GB | ~6x |
| Medium | 769 M | medium.en |
medium | ~5 GB | ~2x |
| Large | 1550 M | N/A | large | ~10 GB | 1x |
For developers working with English-only applications, it’s essential to consider the performance differences among the .en models — specifically, tiny.en and base.en, both of which offer better performance than the other models.
Whisper utilizes a Seq2seq (i.e., transformer encoder-decoder) architecture commonly employed in language-based models. This architecture’s input consists of audio frames, typically 30-second segment pairs. The output is a sequence of the corresponding text. Its primary strength lies in transcribing audio into text, making it ideal for “audio-to-text” use cases.

Real-Time Sentiment Analysis
Next, let’s move into the different components of our real-time sentiment analysis app. We’ll explore a powerful pre-trained language model and an intuitive user interface framework.
Hugging Face Pre-Trained Model
I relied on the DistilBERT model in my previous article, but we’re trying something new now. To analyze sentiments precisely, we’ll use a pre-trained model called roberta-base-go_emotions, readily available on the Hugging Face Model Hub.
Gradio UI Framework
To make our application more user-friendly and interactive, I’ve chosen Gradio as the framework for building the interface. Last time, we used Streamlit, so it’s a little bit of a different process this time around. You can use any UI framework for this exercise.
I’m using Gradio specifically for its machine learning integrations to keep this tutorial focused more on real-time sentiment analysis than fussing with UI configurations. Gradio is explicitly designed for creating demos just like this, providing everything we need — including the language models, APIs, UI components, styles, deployment capabilities, and hosting — so that experiments can be created and shared quickly.
Initial Setup
It’s time to dive into the code that powers the sentiment analysis. I will break everything down and walk you through the implementation to help you understand how everything works together.
Before we start, we must ensure we have the required libraries installed and they can be installed with npm. If you are using Google Colab, you can install the libraries using the following commands:
!pip install gradio
!pip install transformers
!pip install git+https://github.com/openai/whisper.git
Once the libraries are installed, we can import the necessary modules:
import gradio as gr
import whisper
from transformers import pipeline
This imports Gradio, Whisper, and pipeline from Transformers, which performs sentiment analysis using pre-trained models.
Like we did last time, the project folder can be kept relatively small and straightforward. All of the code we are writing can live in an app.py file. Gradio is based on Python, but the UI framework you ultimately use may have different requirements. Again, I’m using Gradio because it is deeply integrated with machine learning models and APIs, which is ideal for a tutorial like this.
Gradio projects usually include a requirements.txt file for documenting the app, much like a README file. I would include it, even if it contains no content.
To set up our application, we load Whisper and initialize the sentiment analysis component in the app.py file:
model = whisper.load_model("base") sentiment_analysis = pipeline( "sentiment-analysis", framework="pt", model="SamLowe/roberta-base-go_emotions"
)
So far, we’ve set up our application by loading the Whisper model for speech recognition and initializing the sentiment analysis component using a pre-trained model from Hugging Face Transformers.
Defining Functions For Whisper And Sentiment Analysis
Next, we must define four functions related to the Whisper and pre-trained sentiment analysis models.
Function 1: analyze_sentiment(text)
This function takes a text input and performs sentiment analysis using the pre-trained sentiment analysis model. It returns a dictionary containing the sentiments and their corresponding scores.
def analyze_sentiment(text): results = sentiment_analysis(text) sentiment_results = { result[’label’]: result[’score’] for result in results }
return sentiment_results
Function 2: get_sentiment_emoji(sentiment)
This function takes a sentiment as input and returns a corresponding emoji used to help indicate the sentiment score. For example, a score that results in an “optimistic” sentiment returns a “😊” emoji. So, sentiments are mapped to emojis and return the emoji associated with the sentiment. If no emoji is found, it returns an empty string.
def get_sentiment_emoji(sentiment): # Define the mapping of sentiments to emojis emoji_mapping = { "disappointment": "😞", "sadness": "😢", "annoyance": "😠", "neutral": "😐", "disapproval": "👎", "realization": "😮", "nervousness": "😬", "approval": "👍", "joy": "😄", "anger": "😡", "embarrassment": "😳", "caring": "🤗", "remorse": "😔", "disgust": "🤢", "grief": "😥", "confusion": "😕", "relief": "😌", "desire": "😍", "admiration": "😌", "optimism": "😊", "fear": "😨", "love": "❤️", "excitement": "🎉", "curiosity": "🤔", "amusement": "😄", "surprise": "😲", "gratitude": "🙏", "pride": "🦁" }
return emoji_mapping.get(sentiment, "")
Function 3: display_sentiment_results(sentiment_results, option)
This function displays the sentiment results based on a selected option, allowing users to choose how the sentiment score is formatted. Users have two options: show the score with an emoji or the score with an emoji and the calculated score. The function inputs the sentiment results (sentiment and score) and the selected display option, then formats the sentiment and score based on the chosen option and returns the text for the sentiment findings (sentiment_text).
def display_sentiment_results(sentiment_results, option):
sentiment_text = ""
for sentiment, score in sentiment_results.items(): emoji = get_sentiment_emoji(sentiment) if option == "Sentiment Only": sentiment_text += f"{sentiment} {emoji}\n" elif option == "Sentiment + Score": sentiment_text += f"{sentiment} {emoji}: {score}\n"
return sentiment_text
Function 4: inference(audio, sentiment_option)
This function performs Hugging Face’s inference process, including language identification, speech recognition, and sentiment analysis. It inputs the audio file and sentiment display option from the third function. It returns the language, transcription, and sentiment analysis results that we can use to display all of these in the front-end UI we will make with Gradio in the next section of this article.
def inference(audio, sentiment_option): audio = whisper.load_audio(audio) audio = whisper.pad_or_trim(audio) mel = whisper.log_mel_spectrogram(audio).to(model.device) _, probs = model.detect_language(mel) lang = max(probs, key=probs.get) options = whisper.DecodingOptions(fp16=False) result = whisper.decode(model, mel, options) sentiment_results = analyze_sentiment(result.text) sentiment_output = display_sentiment_results(sentiment_results, sentiment_option) return lang.upper(), result.text, sentiment_output
Creating The User Interface
Now that we have the foundation for our project — Whisper, Gradio, and functions for returning a sentiment analysis — in place, all that’s left is to build the layout that takes the inputs and displays the returned results for the user on the front end.

The following steps I will outline are specific to Gradio’s UI framework, so your mileage will undoubtedly vary depending on the framework you decide to use for your project.
We’ll start with the header containing a title, an image, and a block of text describing how sentiment scoring is evaluated.
Let’s define variables for those three pieces:
title = """"""
image_path = "/content/thumbnail.jpg" description = """ 💻 This demo showcases a general-purpose speech recognition model called Whisper. It is trained on a large dataset of diverse audio and supports multilingual speech recognition and language identification tasks.📝 For more details, check out the \[GitHub repository\](https://github.com/openai/whisper).
⚙️ Components of the tool:
- Real-time multilingual speech recognition
- Language identification
- Sentiment analysis of the transcriptions
🎯 The sentiment analysis results are provided as a dictionary with different emotions and their corresponding scores.
😃 The sentiment analysis results are displayed with emojis representing the corresponding sentiment.
✅ The higher the score for a specific emotion, the stronger the presence of that emotion in the transcribed text.
❓ Use the microphone for real-time speech recognition.
⚡️ The model will transcribe the audio and perform sentiment analysis on the transcribed text.
"""
Applying Custom CSS
Styling the layout and UI components is outside the scope of this article, but I think it’s important to demonstrate how to apply custom CSS in a Gradio project. It can be done with a custom_css variable that contains the styles:
custom_css = """ #banner-image { display: block; margin-left: auto; margin-right: auto; } #chat-message { font-size: 14px; min-height: 300px; } """
Creating Gradio Blocks
Gradio’s UI framework is based on the concept of blocks. A block is used to define layouts, components, and events combined to create a complete interface with which users can interact. For example, we can create a block specifically for the custom CSS from the previous step:
block = gr.Blocks(css=custom_css)
Let’s apply our header elements from earlier into the block:
block = gr.Blocks(css=custom_css) with block: gr.HTML(title) with gr.Row(): with gr.Column(): gr.Image(image_path, elem_id="banner-image", show_label=False) with gr.Column(): gr.HTML(description)
That pulls together the app’s title, image, description, and custom CSS.
Creating The Form Component
The app is based on a form element that takes audio from the user’s microphone, then outputs the transcribed text and sentiment analysis formatted based on the user’s selection.
In Gradio, we define a Group() containing a Box() component. A group is merely a container to hold child components without any spacing. In this case, the Group() is the parent container for a Box() child component, a pre-styled container with a border, rounded corners, and spacing.
with gr.Group(): with gr.Box():
With our Box() component in place, we can use it as a container for the audio file form input, the radio buttons for choosing a format for the analysis, and the button to submit the form:
with gr.Group(): with gr.Box(): # Audio Input audio = gr.Audio( label="Input Audio", show_label=False, source="microphone", type="filepath" ) # Sentiment Option sentiment_option = gr.Radio( choices=["Sentiment Only", "Sentiment + Score"], label="Select an option", default="Sentiment Only" ) # Transcribe Button btn = gr.Button("Transcribe")
Output Components
Next, we define Textbox() components as output components for the detected language, transcription, and sentiment analysis results.
lang_str = gr.Textbox(label="Language")
text = gr.Textbox(label="Transcription")
sentiment_output = gr.Textbox(label="Sentiment Analysis Results", output=True)
Button Action
Before we move on to the footer, it’s worth specifying the action executed when the form’s Button() component — the “Transcribe” button — is clicked. We want to trigger the fourth function we defined earlier, inference(), using the required inputs and outputs.
btn.click( inference, inputs=[ audio, sentiment_option ], outputs=[ lang_str, text, sentiment_output ]
)
This is the very bottom of the layout, and I’m giving OpenAI credit with a link to their GitHub repository.
gr.HTML(’’’ <div class="footer"> <p>Model by <a href="https://github.com/openai/whisper" style="text-decoration: underline;" target="_blank">OpenAI</a> </p> </div>
’’’)
Launch the Block
Finally, we launch the Gradio block to render the UI.
block.launch()
Hosting & Deployment
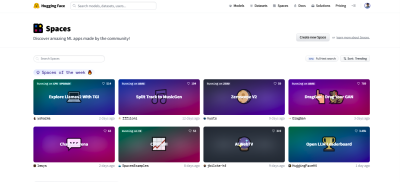
Now that we have successfully built the app’s UI, it’s time to deploy it. We’ve already used Hugging Face resources, like its Transformers library. In addition to supplying machine learning capabilities, pre-trained models, and datasets, Hugging Face also provides a social hub called Spaces for deploying and hosting Python-based demos and experiments.

You can use your own host, of course. I’m using Spaces because it’s so deeply integrated with our stack that it makes deploying this Gradio app a seamless experience.
In this section, I will walk you through Space’s deployment process.
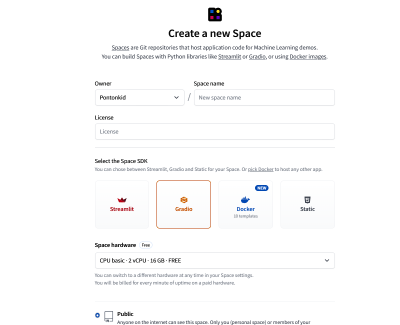
Creating A New Space
Before we start with deployment, we must create a new Space.
The setup is pretty straightforward but requires a few pieces of information, including:
- A name for the Space (mine is “Real-Time-Multilingual-sentiment-analysis”),
- A license type for fair use (e.g., a BSD license),
- The SDK (we’re using Gradio),
- The hardware used on the server (the “free” option is fine), and
- Whether the app is publicly visible to the Spaces community or private.

Once a Space has been created, it can be cloned, or a remote can be added to its current Git repository.
Deploying To A Space
We have an app and a Space to host it. Now we need to deploy our files to the Space.
There are a couple of options here. If you already have the app.py and requirements.txt files on your computer, you can use Git from a terminal to commit and push them to your Space by following these well-documented steps. Or, If you prefer, you can create app.py and requirements.txt directly from the Space in your browser.
Push your code to the Space, and watch the blue “Building” status that indicates the app is being processed for production.

Final Demo
Conclusion
And that’s a wrap! Together, we successfully created and deployed an app capable of converting an audio file into plain text, detecting the language, analyzing the transcribed text for emotion, and assigning a score that indicates that emotion.
We used several tools along the way, including OpenAI’s Whisper for automatic speech recognition, four functions for producing a sentiment analysis, a pre-trained machine learning model called roberta-base-go_emotions that we pulled from the Hugging Space Hub, Gradio as a UI framework, and Hugging Face Spaces to deploy the work.
How will you use these real-time, sentiment-scoping capabilities in your work? I see so much potential in this type of technology that I’m interested to know (and see) what you make and how you use it. Let me know in the comments!
Further Reading On SmashingMag
(gg, yk, il)
