
- So, what is rendering and why is it important?
- Render and export with a Render Queue panel
- Step by step tutorial on how to render and export with Adobe Render Queue
- Render and export with an Adobe Media Encoder
- Step by step tutorial on how to render files with Adobe Media Encoder
- How to speed Up render time in After Effects
- In case you don’t have time to create a composition
How to render in After Effects?
Any part of a project is important. Yet, when it comes to Adobe After Effects everything you do will be in vain if rendering was done poorly. And it is important to make rendering the right way if you want to create something outstanding. Otherwise, you will have a low quality video that glitches. And POOF: all your efforts don’t matter and your project looks silly.
I agree, that rendering is annoying, but it can’t be helped, you have to render a project and you have to render it well. This is why I made this post and I hope it will help you render better, and most importantly — faster.
So, what is rendering and why is it important?
Rendering is a process that allows you to create a video product in After Effects. Basically, it is the final part of any project in After Effects. It allows you to create a product with all the details and resolution you may need. And most importantly it will help you to balance the quality and size of a video file you create.
We can describe this process as the creation of a frame from the whole composition. It combines all layers with images, music, effects and other data in one frame. Basically, this is how you develop a movie.
We can say that there are two ways to render in After Effects.
The first way is to render products via Render Queue feature built in the After Effects. I’d recommend this way if your PC is a bit old and works slowly sometimes. And if you’re working with hard projects that require time and lots of effort.
Another option is Adobe Media Encoder. This is a side program from Adobe and it can make your life easier. It has all the necessary features for media data processing. Like ingest, transcode, create proxies, and output to any format. Most importantly it works not only with After Effects but also with other Adobe applications. I’d recommend you to check its official page if you want to learn more.
Just a few small notes:
- if you have an old After Effects version then do not forget to download Quicktime codecs;
- if you render with Adobe Media Encoder make sure that it matches Adobe Effects version, in most cases, it means that you have to use the same year versions.
Render and export with a Render Queue panel
Render Queue is the built-in feature. As the name implies you can simply render media files with this feature. At first, you have to create a composition. Then place a composition into the render queue.
- You should simply click on it and choose the “Add to Render Queue”.
After you do that, your composition becomes a render item. Keep in mind that you can add few render items at a time and After Effects will render them separately. Moreover, each render item has its own render settings, and you can play with them too.
Some of the settings that you can make use of:
- Duration
- Output frame rate
- Resolution
- Layer quality
After you are done with render item settings there will come the post-render customization. You will be able to choose an Output format, Compression options, and Cropping format. With Render Queue you can render one composition into different formats at once, and do not forget that you can choose, copy and reorder render items with keyboard shortcuts.
Step by step tutorial on how to render and export with Adobe Render Queue
It is very likely that you have found this post after searching the phrase “How to render in After Effects” in Google. And I think you need a step by step instruction, not a huge piece of text. After all, rendering is not that hard when you know what to do.
And this is why I’ve created some tutorials and you can follow them if you need to render your media content. After you learn my way you can play more with Adobe After Effects and find out what it can do.
There will be two step by step tutorials. And the first will be an instruction on how to render a video with an optimal ratio of size and quality in Render Queue.
- Start with opening a composition you want to render.
- Then go to Composition and click on Add to Render Queue button.
- After that click on a blue text next to the Output Mode.

- Here you have to choose a Quicktime in a format frame. At this moment you can also choose post-render options. You can do it in a frame under the Format. You can also choose whether to include Project Link and source XMP Metadata.
- And press the Format Options.
- Now we have to choose Video Codec. Personally, I prefer ProRes 4444. And I recommend you do the same.
- Press OK.
- Go to the Channels and choose RGB + Alpha and press OK.
- And the last thing is to save your file. Go to the Output to and browse the destination.
- Press Enter and Render button. And here you have a rendered video!
You can check if your render item is ready in the Status column. If you see that your file is DONE then it’s ok, and you managed to render it successfully. If it is Failed, User Stopped, Queued, Unqueued or Needs Output then something went wrong and you should pay more attention to it.
Render and export with an Adobe Media Encoder
Adobe Media Encoder provides you with more flexibility when it comes to rendering. It allows you to work in After Effects while rendering files. And it gives you more options and provides you with additional presets.
Adobe Medial Encore makes life easier when you have to work with different videos at the same time. And here is one more fast render tutorial on how to render in After Effects with Media Encoder.
Step by step tutorial on how to render files with Adobe Media Encoder
Personally, I recommend you use the H.264 format. It is quite responsive and works on all devices. And most importantly it has optimal size and provides nice video quality. Yet, you can play with different formats to see which one is better for you. They all have some pros and cons.
- Open a composition you want to render.
- Go to Composition and press Add To Adobe Media Encoder Queue.
- Wait a bit until Media Encoder opens.
- Press the arrow in the Format section and choose H.264.
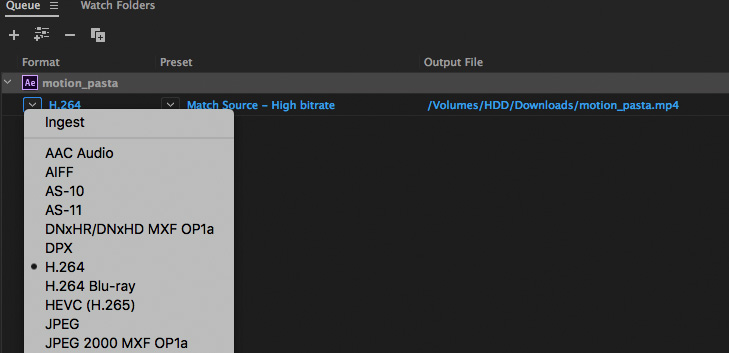
- Now go to preset and choose Match Source – High Bitrate.

- Choose the destination of a file in Output File.
- And press Enter. Or the green triangle.
- That’s all, you have started rendering of your product.
In the end, your few minutes video will be a few hundred megabytes in size. Not a few gigabytes as it was before rendering.
How to speed up render time in After Effects?
It is quite an obvious question. Especially when you work on a huge project and you have to render may video at a time. And if you are tired to wait until the project is ready, then I have a few pieces of advice for you.
- Upgrade your RAM. To use After Effects and render tons of videos day by day you will need at least 16 Gigabytes of RAM, having 32 gigs will let you run it extremely smooth.
- Turn on Multiprocessing. If you go to Preferences and choose Memory and Multiprocessing you can manually turn on multiprocessing. it means that After Effects will render different frames using different processing cores.
- Keep compositions clean. If there is an empty layer in your composition After Effects will render it. And if you have two similar layers they will both be rendered. It will be faster if you gave After Effects queue lees work.
- Do not use unnecessary features. For example, pre-comps and ray-traced 3D features are cool tools that will provide you with new options. Yet, they definitely make rendering much slower. Don’t use them all the time. Unless you need them.
- Try not to start other programs while rendering. After all, you need all RAM you can get to render faster.
- Use two hard drives. Do it when it is possible. After all, if one hard drive renders and then saves your data the process will be much slower. Imagine forcing someone to do two things at a time.
I hope these tutorials will be useful for you and now you know how to render with After Effects. Just follow these tutorials and you’ll be fine. And one more thing. Do not forget to keep an eye on Adobe After Effects updates. Adobe developers constantly work on upgrading After Effects and the want to make it as fast as possible.
In case you don’t have time to create a composition
We have many templates. In case you do not want to create content yourself you can use them to develop visual products faster. Most of them are professionally developed. So when you purchase one of them the only thing you should care about is how much you like it.
Dynamic Website Presentation After Effects Intro

This After Effects intro is a great option if you are looking for something clean and eye-catchy. This template is a perfect option for business presentations, fashion magazines, photographer portfolio and so on. It is dynamic and stylish. And you can check out yourself how black and white colors create a true masterpiece. Just go to the product page and check out the demo video.
Dynamic Reel After Effects Intro

This is another dynamic After Effects intro. However, this time it’s creative and colorful. You can easily use it to create a motivation video, sports presentation, film opener or a video game intro. It suits any product that requires colorful elements.
Neon Light Christmas Card After Effects Intro

Need something bright for your movie? Maybe some Neon lights? Then we are here to help you. As the name implies this After Effects template is a great option if you want to make your video more eye-catching while congratulating everyone with Christmas, it is easy to edit in After Effects and, it will be even more easier with this template.
Colorful Opener After Effects Intro

Here comes a truly multipurpose Intro. Due to its colorful nature, this template suits tourist company videos, music videos, fashion video and so on. If you can tolerate orange color in your video then use this template. And pay attention to elements design, they are quite original.
Travel Postcard After Effects Intro

As the name implies this After Effects template is a perfect choice for travel business. Or if you want to create a video about tourism or post service. It will be useful even for wedding niche. And you can easily use them to render in After Effects.
Elegant Slideshow After Effects Intro

You can render and export with After Effects. And if you need something that renders fast, then use this Elegant Slideshow intro. It includes 16 placeholders, 16 text layers, and a logo placeholder.
Animated Logo In The Liquid Motion Style After Effects Intro
And if you want to present your logo in a nice way before a video, or simply present it in video format, then you need this Animated Logo intro with a liquid motion style.
It is modern, stylish and includes sound. You can check all logo intros video on a product page.
- 2 versions
- Sound FX included
- Easy color setup with checkbox controller
- 4K or 1080p resolution
New Urban Style Intro/Opener After Effects Template

Cinematic Intro After Effects Template

Social Media Intro After Effects Template

Read Also
6 Types of Motion Tracking in After Effects
How to Cut and Edit Videos in After Effects in After Effects
Most Popular After Effects Keyboard Shortcuts [iOS]
After Effects – 8 Ways to Increase Productivity and Render Speed
The post How to Render in After Effects? A few Useful Tips About Rendering appeared first on MonsterPost.