
There is a strange ritual that web developers around the world have been perpetuating from the dawn of computers to modern days. Without this ritual, the web application cannot really exist. It is not “ready to go live,” a web developer would say. This ritual is the implementation of authentication.
You may have been through this ritual multiple times. But do you really understand what is happening?
This article is my attempt at making this ritual less obscure. It shouldn’t have to take a wizard to implement a good authentication system. Just a good banker!
Your Password Matched. Now What?
Authentication is the process of attributing a given request to a unique entity, usually a person. It then enables authorization, the process of allowing (or not) said person to access a resource, be it a web page or an API endpoint.
I will focus on the part I’ve always found the most difficult to understand: what happens after the user just submitted the login form and their credentials were confirmed as valid by the backend.
app.post("/login", async (request, response) => { const { body } = request; const user = await getUserByCredentials(body.username, body.password); if (user) { // NOW WHAT??? }
Your typical login endpoint. This article is about what happens afterward.
We are going to talk about tokens, CORS, cookies, and headers. Those concepts are sometimes quite abstract. To make them more real, I’ll take a shot at a banking analogy.
Authentication Relies On Tokens Like Banks Rely On Money
Let’s consider two common patterns:
- JSON Web Tokens aka JWT.
It’s an open standard. You’ll find useful resources at the bottom of this article if you want to go further. - Session-based authentication.
It’s a pattern more than a standard. So the implementation may vary, but I’ll try to give an overview of how it works.
As a front-end developer, you may have no control over this design decision, so it’s important that you understand how both work.
As a full-stack or backend developer, you have control over this choice, so it’s even more important that you understand what you are doing. I mean, it’s kinda your job 🙂
A JWT Is Like A Banknote
With JSON Web Token-based authentication (JWT), during the login step, the server will pass the client a token that contains encrypted information, a “claim.” When the client makes a request, they pass this token alongside the request.
The server verifies that this token is indeed a valid token that it itself generated earlier. Then the server reads the token payload to tell who you are, based on a user ID, username, email, or whatever the payload is. Finally, it can authorize or refuse access to the resource.
Think of tokens as banknotes. A banker can print new banknotes like a server can create tokens. Money lets you buy things, or if I rephrase, it lets you access paid goods and services. The JWT lets you access secure services the same way.

If you want to use your money, either at the bank to credit your account or in a store, people will double-check that your banknotes are real. A real banknote is one that has been created by the bank itself. When the banknote is confirmed to be legit, they can read the value on it to tell how many things you can buy.
JWTs work the same, the server can verify that they indeed created this token earlier, so it’s a real one, and then they can read the payload it contains to confirm who you are and what your permissions are.
Revoking a token can be hard. The server has to maintain a list of blacklisted tokens that are no longer valid, like the bank would need to list robbed banknotes’ unique numbers.
Session-Based Authentication Is Like A Credit Card
From the front-end developer standpoint, the main difference between JWT and session-based authentication lies in what the server will return in case of a successful login.
In session-based authentication, instead of having a claim full of user information, you just get a “session id.”
From the backend developer’s standpoint, session-based authentication involves an additional database collection or table to store the sessions. A session is just an object very similar to the JWT, which can contain, for instance, a user id and an expiration date.
This means that the server keeps a lot of control over the authentication. It can log a user out by removing the session from the database, whereas it cannot destroy JWTs, since it doesn’t store them.
Session-based authentication is comparable to credit cards. You go to the bank to open your account. The banker will check your id and issue a credit card with an expiration date. This is the authentication process.

The credit card itself has barely any value: it’s just plastic and a microchip whose purpose is to uniquely identify your account. It can easily be revoked by the bank, usually after a certain period of time, but also when you declare your card stolen.
When you want to pay for something, the store will communicate with your bank to check that your credit card is valid and has a positive balance.
When you access an authenticated resource, the server will check if the session id matches an open session and then if this session matches a user that is authorized to access this resource.
Tokens Are As Precious As Banknotes And Credit Cards. Don’t Get Them Stolen!
It’s easy for companies and banks to store money. They have those big reinforced-steel safes with alarms and sometimes even dragons. Likewise, it’s easy for servers to talk securely to one another.
But websites are like private persons. They can’t have dragons, so they have to imagine specific approaches to store their precious tokens.
Where Do You Store Your Money?
Whatever the pattern you pick to authenticate users, JSON web tokens and session ids are precious things. In the remainder of this article, I will treat them similarly, apart from a few technical subtleties. I’ll call either of them the “authentication token,” the thing you show the server to prove that you are authenticated, like money for paying stuff.
Since you have to pass the token alongside every request you make to the server — you need to store it somewhere on the client side.
Here, I’d like to focus more specifically on the case of websites, where the web browser is in charge of sending the requests. You’ll find many articles and documentation in the wild that do not clarify whether they apply to server-server communication or browser-server. The latter is a trickier, uncontrolled context that deserves its own specific patterns.
So, the banker just handed you either a new credit card or a bunch of banknotes. Where do you stash them? In a compartment concealed in the heel of your shoe, in your mailbox, beneath your mattress, or maybe, in your fancy fanny pack?
Not All Requests Are Born Equal: Loading A Web Page vs. Calling An API
We can divide authenticated content into two categories: web pages and API endpoints. From a technical standpoint, both are server endpoints. The former returns HTML content or files, the latter — any kind of content, often JSON data. They differ in the way they are consumed.
Web pages are accessed via a web browser that triggers GET requests automatically, depending on the current URL.
APIs are called using JavaScript code. This reliance on APIs and JavaScript is at the core of the Jamstack, REST, and Single-Page-Application philosophies.
Thus, let’s differentiate two use cases:
- You want to secure access to the web page itself. Meaning the user can’t even see the structure of your page or any HTML.
- You want to secure calls from your web page to your API. Anyone can see your web page structure, but they can’t get any data.
If you combine both, unauthenticated users can’t see the page structure and can’t get any data from your API.
Use Case 1: Securing A Web Page Access With Cookies
I’ll cut it short, to secure web page access, you have no other choice but to use cookies, ideally HTTP-Only, secure cookies.

From a technical standpoint, a cookie is a piece of data that should be sent alongside every request to a specific domain. They are part of the HTTP protocol.
That’s a pretty broad scope. When a website cookie popup differentiates “essential cookies” from other cookies, those essential cookies are often dedicated to authentication. The others are just a way to keep track of the product pages you’ve visited to later shove them in your face to the point of literally optimizing the billboard displays in your neighborhood as if you really, really wanted to buy two freezers within the same month.
Setting a cookie is possible in both directions. Client-side JavaScript can set cookies to be sent to the server. That’s how advertisement tracking works (though GDPR is forcing advertisers to use server-side logic more and more these days).
But the server can also tell the browser to store a cookie using the Set-Cookie header in the response.
This convenient feature lets the backend set what we call “HTTP-only” cookies: cookies that cannot be read by JavaScript. And “secure” cookies are only set through HTTPS for better security.
Important note: Using HTTP-only cookies prevents XSS attacks (script injection to steal the token) but not CSRF attacks (forging requests on behalf of your authenticated users, basically impersonating them). You need to combine multiple strategies to parry all possible attacks. I invite you to read more on these topics if you manage a non-trivial website.
During the authentication process, the Set-Cookie header should be used in response to the “login” request so the client becomes authenticated via a token.
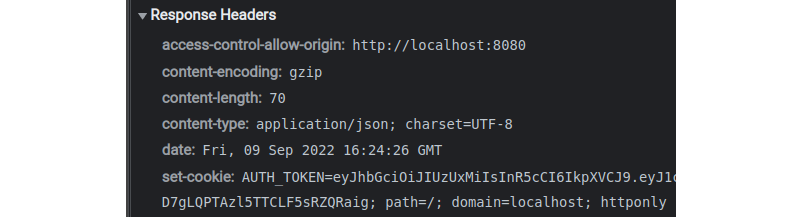
Set-Cookie header in the response of the login request, as seen in browser development tools. The browser will automatically store this cookie. Since it’s HTTP-only, JavaScript can’t read it; it’s only handled by the browser directly. (Large preview)Cookies are like a wallet. You can store fidelity cards in it and a picture of your cat, but also duller things, like your money. It’s in your pocket or your handbag, so it’s hard to access for other people (HTTP-only, no JavaScript access) if you don’t take it out in unsafe places (secure). Yet, you always have your token with you if needed.

localhost mode. (Large preview)Browsers rely a lot on cookies, and they send them automatically alongside every request they trigger as long as the domain and path match, so you don’t have to worry about them. If you carry your wallet with you anytime you go out, you’re always ready to pay.
Cookie header is added automatically to the request emitted by the browser during navigation, as long as the domain and path are matching. (Large preview)Use Case 2: Securing API Calls. The Cookie Scenario
Now, let’s authenticate calls to our API, which feeds the website with data. The easiest option would be to use a cookie, as we did in the previous section, to secure web pages. But contrary to the web page, there is also another option — using web storage. Which one is the most suited is debatable. Let me start with cookies.
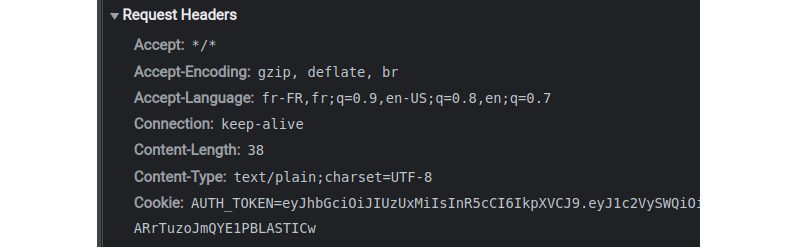
The cookie that contains the auth token is sent automatically alongside requests triggered by the browser when you navigate a website or when you submit a form.
But requests triggered by JavaScript code do not fall into this category. When you trigger a request programmatically, you need a bit more configuration to send cookies.
Remember that the cookie should be HTTP-only, so you can’t read the cookie content with JavaScript nor inject your token in the Authorization header. You could do that with a cookie that is not HTTP-only, but then using a cookie doesn’t make sense in the first place.
All existing libraries capable of sending requests have to be based on the browser JavaScript API aka the “Browser Object Model,” which means either XMLHttpRequest or fetch. You have to rely on their configuration to enable sending HTTP-only cookies alongside the request.
In the case of fetch, this option is named credentials. Hopefully, for you, fellow front-end developers, it’s very easy to use.
fetch( "http://localhost:8000/account/signup", { method: "POST", body: JSON.stringify({username:"foo", password:"barbar"}), // This will include credentials (here, cookies) in the request credentials: "include"
})
With XHR, the option is named withCredentials and behaves similarly.
Note: Your server must also confirm that it indeed accepts credentials by setting the Access-Control-Allow-Credentials header to true in the responses. This option is symmetrical. It controls both sending cookies to the server, but also accepting the Set-Cookie header from it. So don’t forget to set it to true for the call to the login endpoint.
If the credentials option is not set and the server answers with a Set-Cookie header… the browser will silently ignore this attempt to set the cookie without even a warning. When this happens, start by double-checking your credentials option and then CORS if applicable (see next section).
Oops, I’ve almost forgotten your banking analogy! It’s a tough one but let’s say that you probably have your credit card or a few banknotes always there in your wallet. But some services expect a prepaid card, and you may need to explicitly remember to take them with you. That’s the best analogy I could achieve. Comment if you can do better!
Return Of Use Case 2: Securing API Calls. The Web Storage Scenario
Remember, I said earlier that for API calls, you have the choice to either store the token in an HTTP-only cookie, like you would do to secure a web page, or to store the token in the web storage. By web storage, we mean either sessionStorage or localStorage.
I’ve seen and used both approaches, cookies and web storage, but I sincerely don’t have the expertise to assert that one is better than the other. I’ll stick to describing how it works so you can make an enlightened decision.
Codewise, they are much easier to use than HTTP-only cookies because web storage is available to JavaScript code. You can get the token from the login response payload, store it in localStorage, and insert it into the Authorization header in later requests. You have full control of the process without relying on some implicit browser behavior.
headers: { “Authorization”: `Bearer ${window.localStorage.get(“auth_token”)}`
}
Web storage is immune to certain attacks, namely Cross-Site Request Forgery. That’s because, contrary to cookies, they are not automatically tied to requests, so an attacker will have trouble forcing you to give your token. Think of a piggy bank. You can’t just get money out of it. It’s, however, very sensitive to script injection, where an attacker manages to run JavaScript and reads the token.
Therefore, if you go the web storage way, you’ll want to explore strategies that prevent XSS attacks from happening in the first place.
JWT Specifics: What Information They Should Contain And How To Handle The Refresh Token
You should avoid storing critical information in a JSON web token, even when using HTTP-only cookies. If someone still manages to steal and decrypt the token, they will be able to impersonate the user, but at least they won’t be able to get much information from the token itself.
You can afford to lose a five-dollar banknote; it’s more problematic to lose a $5,000 banknote. By the way, if such a thing as a $5,000 banknote exists, please send me a specimen to prove it. Thank you.
JWTs are meant to be short-lived, like banknotes, which would wear quickly when used a lot. Since they are hard to revoke, giving them 5-minute lifetime guarantees that even a stolen JWT token cannot be a big problem.
Since you don’t want the user to log in again every 5 minutes, the token can be combined with a longer-lived refresh token. This second token can be used to get a new JWT.
A best practice is to store the refresh token in a cookie on a very specific path like /refresh (so it’s not sent with all requests, contrary to the JWT) and to make it a one-time-only token.
A refresh token is like bringing your ID card to get more money from your bank account. You don’t do that often, and you probably want to store your ID even more safely than your banknotes.
CORS Is How Shops Communicate With Their Bank
Formally, CORS (Cross-Origin Resource Sharing) is a protocol used by servers in order to instruct browsers to selectively relax some of the Same-Origin Policy (SOP) restrictions on network access for some trusted clients.
Less formally, the server can tell your browser that the request you send is legit based on the request’s origin. If the server says it’s not legit, the browser won’t send the request.
For instance, https://www.foobar.com, https://qarzed.fake, and http://localhost:8080 are possible origins. The port and protocol matter.
An API hosted on https://api.foobar.com will most often allow requests only from https://www.foobar.com and https://mobile.foobar.com.
I will focus here on API calls triggered with fetch in JavaScript, and only if the API lives in another Web origin. CORS also affects more advanced use cases like embedding images from another website in your own website, iframe, navigating from one site to another, and so on, but that’s beyond the scope of authentication per se.
Websites are like stores. People can enter them and try to buy things. But the store also has its own complicated internal back office logic. Namely, it relies on a bank to process payments.
Any shop owner can try to connect to any bank. Any website can try to connect to any API. But the payment won’t be processed by the bank if they don’t have a company account there.

Likewise, if you host the website on www.foobar.com and the API on www.foobar.com/api, there is one origin only www.foobar.com. No need for CORS because there is no “cross-origin” call involved. You’ll need to bother about CORS if, instead, you host the API on api.foobar.com. We have two distinct origins, api.foobar.com and www.foobar.com.
This also applies to using different ports on localhost during development. The IP 127.0.0.1 is even different from localhost, as origins are compared directly as strings and not based on their actual IP address.
Some big companies, like car sellers, have their own internal bank. It’s easier for them to communicate with this bank if it’s literally located in the same office. They are like full-stack monolithic applications.
But if this internal bank is located in a different country (API separate from the website), this doesn’t work anymore. It could as well be a traditional bank with multiple clients (a third-party API). CORS is needed either way.
CORS is a concept specific to browser-server communication. When a server talks to another server, the Same-Origin Policy doesn’t apply. The API may either block those requests with no origin completely or, on the contrary, accept them, or filter them based on IP and so on.
Banks have specific patterns of communicating with each other that are different from how they communicate with their client companies.
A Polite Cross-origin Discussion Between A Server And A Client, Using Preflight Requests
Here’s a more concrete vision of what happens during a cross-origin request and how the server response headers should be set.
From the browser standpoint, whenever a website sends a “non-simple” request to an API, the browser will first send a preflight request. It’s a request to the same URL but using the OPTIONS method, which is dedicated to checking whether you can actually consume this API endpoint.
Fetching JSON data falls into this “non-simple” category in standard browsers, as well as calling your login endpoint if the auth API doesn’t live on the same domain as your website, so this step is extremely important.
The server receives this request, which includes an Origin header. It checks its own list of accepted origins. If the origin is allowed, it will respond with the right Access-Control-Allow-Origin header.
This server header should match the website’s origin. It can also be a wildcard * if the API is totally open, but that works only for requests without credentials, so forget about this if your API requires authentication.
If the response header doesn’t match, the browser will trigger an error at this point because they already know that they can’t call this API. Otherwise, they will keep going and send the actual request.
A store (the API) can decide to accept only certain types of credit cards. Some stores accept only their own card, and they don’t even use CORS (same-origin scenario). Some stores accept only Visa or Mastercards (cross-origin scenario). The cashier (the browser) won’t let you pay if they are told your card is not accepted by the store.
There are a few other Access-Control headers that provide more information, like accepted methods or headers. Allow-Origin is the most basic one, as well as Allow-Credentials, so cookies and Set-Cookie headers are properly enabled when using fetch.
Access-control-allow-origin: https://www.foobar.com
Access-control-allow-credentials: true
Expected response headers for an authenticated call (or the “login” form submission) if the website lives on https://www.foobar.com and the API is on another domain or port.
Note: The server specifies the CORS policy, and the browser enforces it. If suddenly everyone used an unsafe browser run by pirates, they could swarm your server with forged requests. Hopefully, people usually don’t use a shady browser they found in a USB key itself found lying on the ground of a dark alley at 3 am.
The header things and the browser behavior are just politeness. The browser is an excessively polite software. It will never spam the server with requests that will be rejected anyway. And it won’t talk to rude servers that don’t set the proper headers. That’s why the Accept-Control-Allow-Origin response header must be correctly set for cross-origin requests to work.
Before going as far as aiming a customer with a shotgun, the banker will probably tell you, “sir, you entered the wrong bank office,” and the customer will probably answer, “oh, sorry, my mistake. I will leave immediately!”.
Cookies Or Not Cookies: The SameSite Option
Setting the credentials attribute in your fetch request is not enough for sending the cookie, plus it doesn’t apply to pages, only to programmatic requests. The SameSite attribute of cookies lets you configure when a cookie should be sent, depending on the current site.
The concept of “Site” is slightly different from the concept of domain:
https://api.foobar.comandhttps://www.foobar.comare 2 different domains.- They are, however, the same site. Nowadays, the scheme matters, too (HTTP vs. HTTPS).
- There is an exception to this rule, e.g., in multi-tenant architectures:
foo.github.ioandbar.github.iowill be different sites despite having the same domain, and the server owner can configure that to their will.
If the Access-control response headers are correctly set, and the preflight request succeeds, the browser will proceed with the actual request.
But if SameSite is not set with the right value in the cookie containing the authentication token, this cookie won’t be sent to the server. When loading a page, you will be considered unauthenticated by the server just because it literally doesn’t have your cookie.
The SameSite: Lax value is usually the most appropriate. It will only send cookies to the same site but also when the user comes from another site and is redirected to your page (only for top-level navigations). This is the current default in most browsers.
With SameSite: Lax, the website www.foobar.com will automatically include the authentication cookie when it sends requests to api.foobar.com, which is part of the same site. Authentication will work as expected.
Sec-Fetch Helps Detecting Cross-origin Requests But Are Not Standard Yet
Related to CORS, you may also hear about the Sec-Fetch request headers. They provide information about the request context to the server. For instance, if Sec-Fetch-Site is same-origin, there is no need to check the Origin header. It’s slightly more intuitive than manually checking the request origin against predefined rules. If it’s same-site, you still need to add the required CORS headers in the response because the site and the origin are different concepts.
However, those headers are not sent by all browsers. Namely, Safari doesn’t support them at the time of writing. Therefore, they can only act as a secondary solution to identify a request’s origin.
A bank can identify you via your passport, but not everybody has a passport, so you will always need to resort to a good old ID card. Passports are still a cool way to identify people when available. That’s what the Sec-Fetch headers are.
Keep in mind that attackers may trick users into sending requests they don’t want to, but they still have no control over which browser will send the request. Thus, Sec-Fetch headers are still useful despite being supported only by some browsers. When they are present, they are a reliable piece of information.
More broadly, cross-origin and cross-site security patterns are based on the fact that users are using legitimate browsers that should never try to voluntarily mislead servers about the origin. Beware of more elaborate attacks, such as subdomain takeover, that can still bypass these security measures.
You may think, what about servers, then? Server requests are able to spoof a request origin, effectively bypassing CORS. Well, that’s right: CORS is a browser-server security mechanism; it simply doesn’t apply to server-server calls. Someone can build an API that calls your own API and serve the result to another website. True.
However, the thief will have to host a server, which isn’t free, so they will pay actual money for this API call, and the server IP may be traced back to them. It’s way less attractive than forcing browsers to send the request directly to your API, which would be free and trace back to the first victim, your user, and not to the attacker. Thanks to CORS, this worst-case scenario is not possible.
No, We Don’t Take Checks: Don’t Confuse A Web Page Access And An API Call
If you’ve stumbled upon this article, you have probably read a lot of documentation before that. You might have encountered various patterns that seem very different from one another and may be very different from what I’ve been describing so far.
I’d like to point out that this article is about authentication for websites. This is, I believe, the root of all confusion. First, the requests are sent by a browser, not by another server. Then, a page of a website can be accessed via the URL bar, and the website can send calls to an API via JavaScript; that’s two very different situations.
We have detailed the technical differences between each scenario earlier in this article. But let’s recap again to better understand the most common sources of confusion.
Using Browser Storage (Session, Local, And Friend) Is Like Using Your Mailbox As A Piggy Bank
Setting your token in localStorage is like storing money in your physical mailbox. Well, technically, it’s safe. It’s even used to temporarily store your mail. Session storage is similar; it’s just like getting your mail every day instead of letting it rot for weeks. Be nice to the postman!
But either way, the storage is accessible to JavaScript. It’s not open like your mailbox most probably has a lock. But it’s still lying outside.
Someone who is really mean could craft a key and go as far as discreetly stealing your mail for days. That’s what would happen to your users if someone manages to run a script injection attack in your application. They can craft a JS script that reads the localStorage, and sends them the tokens of any of your users affected by the breach!

There are ways to prevent cross-scripting attacks. It’s not a fatality, and some would argue that it’s still better than using an HTTP-only cookie! But if you go the web storage way, don’t forget to protect your mailbox.
I’d like to go one step further and understand why so many developers are tempted to use the browser storage without even considering the cookie option.
I think there are two main reasons:
- The API doesn’t use
Set-Cookieduring the login step. It often happens in APIs that were not specifically designed to be accessed from a browser, and they use an authentication pattern that works for servers, too (so no cookies). Your back-end developer will claim it was a “design choice.” Don’t trust them. - The client needs to set an
Authorizationheader with the token. That’s just the symmetrical issue; the API chose not to rely on cookies.
You’ll meet a lot of documentation in the wild that shows headers like this:
Authorization: Bearer <token>
Setting the Authorization header implies you cannot use an HTTP-Only cookie. Of course, you can set the headers of a request using JavaScript. However, this means that the token must be available to JavaScript in the first place. Let’s repeat it once again: it’s ok not to use a cookie and prefer web storage, but be very careful with XSS attacks!
Moreover, this pattern works only for programmatic requests with fetch and XHR. You can’t secure access to the web page itself because the browser won’t set this header automatically during navigation. You just really can’t.
If you need to secure web pages, the backend of your website (which may differ from your actual API that serves data) should use HTTP-only cookies, or you should set a non-HTTP-only cookie manually. Either way, be careful that by using cookies, you are introducing a new vector of attacks.
Not all websites need to be secured this way, though. It’s actually pretty uncommon for public-facing websites. Remember Blitz.js’ motto “secure data, not pages.” But the cookie way is still a pattern you must be aware of.
If you really need to secure a web page, reach out to your backend developer and explain to them that cookies are good. They won’t contradict this claim.
If it’s really not possible to improve the API, you might want to adopt a pattern named “backend-for-frontend” (BFF). Basically, have a tiny server owned by the front-end team that takes care of calling authenticated APIs server-side, among other things. It works pretty well with frameworks like Remix or Next.js that have built-in server-oriented features.
Of course, every rule must have its exceptions. There is only one common scenario I know where the token can be passed as a request header without using JavaScript: using basic authentication.
Basic authentication is an unsafe pattern, as identifiers are sent alongside every request, not just a token but the actual username and password. It’s a bit like asking your local drug dealer to pay your rent and give them your ID card and 2000$ that they should kindly bring to your landlord. It’s only ok if this is a fake ID. Actually, no, fake IDs and drug dealers are not ok. But you get the point!
It’s still interesting for a few use cases, like quickly securing the demo of a website. As long as you can accept the password to be stolen without that many consequences, typically if the password has been generated by an admin for a temporary occasion (NOT a user-set password that could be reused for multiple services!).
In basic authentication, the browser sets the Authorization header for you. You still need to set the credentials option properly when using fetch programmatically so that the header is also set in this case. But you don’t have to manually tweak the header. It really behaves like a cookie.
That’s actually one reason why this fetch option is named “credentials” and not just “cookies”: it also applies to the basic authentication header.
Conclusion
Wow, if you’ve read this far, you definitely earned your right to a quick summary!
But before that, I have another gift for you: an open-source demo of authentication with Deno and HTMX for the front end!
This is a very basic setup, but it puts the concepts described in this article into action using the “cookie way.”
Here is your well-deserved TL;DR:
- JWT is like banknotes, and sessionId is like credit cards. They are two authentication patterns, but either way, you want to store those tokens safely client-side.
- One safe place to store tokens in a browser is an HTTP-only and secure cookie, set via the
Set-Cookieheader of the login response. It cannot be stolen by malicious JavaScript code. Web storage is another possibility if you only secure API calls and not web page access. If you pick web storage, then be very careful with XSS attacks. - Cookies are automatically sent alongside every request provided you use the right options, namely the
pathandSameSiteattributes of the cookie. Like a wallet, you would carry it on you all the time and take it out of your bag only in safe places when a payment is needed. - When navigating via URL, the browser takes care of sending the cookie containing the auth token (if properly set). But you may also need to call authenticated APIs using JavaScript code. Fetch
credentialsand XHRwithCredentialsoptions have to be configured correctly, so cookies are also sent alongside those programmatic requests. Don’t forget to set theAccess-Control-Allow-Credentialsresponse header as well. - Auth is about politeness: the server must set the proper headers for everything to work. You can’t enter a bank and yell at people to get your money.
- This is particularly true for cross-origin requests. Companies must have secure and polite discussions with their bank, which can be separate organizations or located in a distant country. That’s what CORS is for websites and APIs. Don’t forget to properly set the
Access-Control-Allow-OriginandAccess-Control-Allow-Credentialsheaders in the response. - If you store your savings in your mailbox, put a camera on top of it, and if you store your token in the web storage, protect it against XSS attacks.
- Banks don’t treat people like they treat other banks. Don’t confuse webpages patterns (have to rely on cookies and browser’s built-in features) and API patterns (relying on headers, which can be implemented using client-side JavaScript).
- Basic auth is a fun pattern that blurs the line, as it uses an Authorization header like for APIs, but it can be used for webpages too. It’s a specific and very insecure pattern that is only meant for a handful of limited use cases. Basic auth headers are a reason why
fetchandXHRoptions are named “credentials” and not just “cookies.”
Resources
- Sending programmatic requests with fetch (as opposed to accessing a URL or submitting an HTML form and letting the browser send the request):
- Intro to JWT token.
You’ll notice the ambiguity: it states that JWT should not be stored in browser storage, yet they should usually be passed via header… which implies storing the token in browser storage. But that’s not the only choice. HTTP-only cookies can be used too, and which is the best is an open debate. - “Web Storage: the lesser evil for session tokens”, James Kettle
HTTP-only cookies are debated: an article in favor of the web storage. - Reflections on the REST architectural style and “principled design of the modern web architecture” (impact paper award), Fielding, R. T., Taylor, R. N., Erenkrantz, J. R., Gorlick, M. M., Whitehead, J., Khare, R., & Oreizy, P. (2017, August). In Proceedings of the 2017 11th joint meeting on foundations of software engineering (pp. 4-14).
This paper from Fielding et al. states that the use case of session management has been overlooked in the past when defining the REST architectural style, leading to confusion and poor technological solutions - You’ll find many great tutorials in the wild. A quick search for “authentication” on Smashing Magazine will confirm that there are already two great pieces just for Next.js:
- Standard RFC for JWT
- “The Current State Of Authentication: We Have A Password Problem”, Drew Thomas
There are other ways to authenticate the user than passwords. Most of the content of my article should, however, still hold even with other approaches (magic link, OpenID Connect…). - The OPTIONS HTTP verb used by the CORS preflight request (triggered on non-simple requests like calling a JSON API with fetch)
- Breaking CORS preflight request to bypass CORS
- “Exploiting CORS misconfigurations for Bitcoins and bounties”, James Kettle
Why the scheme (HTTP or HTTPS) matters with CORS; some exploit examples. - The Wildcard exception
- Fetch standard definition of a “client”
- Excellent explanation on Access-Control-Allow-Origin, the header that controls CORS
- About CORS, and definition of “simple requests”
- XHR withCredentials in Axios
- CSRF
A type of attack to bypass cross-origin restriction (not covered in this article, great read to go further, especially if you go “the cookie way” for API authentication) - Limits of storing tokens in browser storage
- SameSite
Configure the cookies to be sent or not when coming from another site - About the SameSite attribute for cookies, from web.dev
- Subdomain takeover
- What is a “top-level navigation” in the browser
- “Protect your resources from web attacks with Fetch Metadata”, Lukas Weichselbaum
Another brilliant piece from web.dev about Sec-Fetch headers. - The canonical definition of Backend For Front-end.
It’s similar to using a centralized API gateway for the front end, except that BFF is decentralized. - “Cache your CORS, for performance & profit”, Tim Perry
How to cache preflight requests to reduce your API workload (non-standard at the moment but extremely useful at scale). - Redirecting in Next.js
(yk, il)